Introduction
Calendly is a powerful scheduling tool, but for marketers, just booking meetings is not enough — we also need to track conversions accurately.
By setting up Calendly booking conversion tracking with GTM and enabling Google Ads Enhanced Conversions, you’ll be able to measure and optimize your ad campaigns effectively.
This blog will guide you through the exact steps shown in the video tutorial.
Prerequisites
- A Google Tag Manager (GTM) account installed on your site
- A Google Ads account with a conversion action created
- Access to your Calendly booking platform
- Website access to place the GTM container code
 Need Help?
 Hire Me for Setup: WhatsApp Me
Book a Consultation: Schedule a Call
Step-by-Step Setup Guide
Method 1: Google Ads Standard Conversion Tracking (Using Calendly Listener Code)
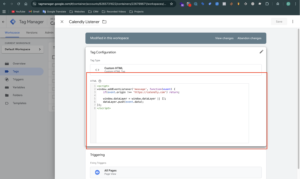
Step 1: Create a Custom HTML Tag in GTM
- In GTM, create a Custom HTML tag.
- Paste your Calendly listener code.
- Save and publish this tag.
Step 2: Create a Conversion Action in Google Ads
- Go to Google Ads → Tools & Settings → Goals → Conversions
- Click + New Conversion Action → Website
- Name it Calendly Booking and set the category → Book appointment
- Conversion Name: Calendly Booking
- Count: One → Done → Save and Continue
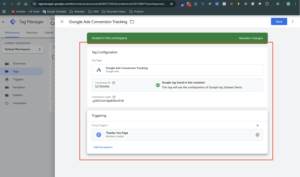
Step 3: Create Tags in GTM
- From your Google Ads Conversion Action, copy the Conversion ID and Conversion Label.
- Paste them into the GTM tag settings.
Step 4: Add a Trigger for Calendly Event
- Go to Triggers → New
- Choose Custom Event
- Enter Event Name:
calendly.event_scheduled
Step 5: Add Conversion Linker Tag
- In GTM, create another New Tag
- Choose Tag Type: Google Ads Conversion Linker
- Trigger: All Pages
- Save & publish

Method 2: Google Ads Enhanced Conversion Tracking (Using Thank You Page Redirection)
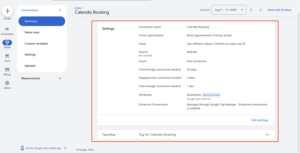
Step 6: Set Up Thank You Page Redirection in Calendly
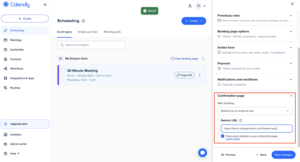
- Inside Calendly Dashboard → go to your Scheduling Booking Event
- Open Notifications and Cancellation Policy → Confirmation Page
- Choose Redirect to External Site
- Enter your custom Thank You Page URL (e.g.,
https://yourdomain.com/thank-you) - ✅ Enable Pass event details to your redirected page
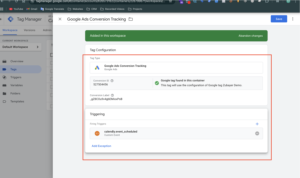
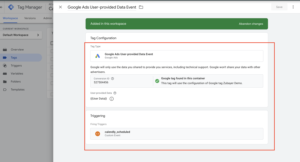
Step 7: Create a Conversion Tracking Tag in GTM
- In GTM, go to Tags → New
- Choose Google Ads Conversion Tracking
- Enter the Conversion ID and Label from Google Ads
- For Trigger → Choose Page View → Some Page Views
- Set rule: Page URL contains /thank-you (or your Calendly confirmation page URL)
- Save the tag
Step 8: Enable Enhanced Conversions
- In the same Google Ads Conversion Tag → scroll down → Enable Enhanced Conversions
- Select Manual setup
- Use GTM variables to capture: First Name, Last Name, Phone Number, Email (from Calendly form)
- Map variables properly
- Save & close
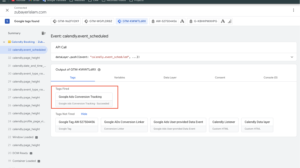
Step 9: Test the Setup
- Open Tag Assistant (Preview mode) in GTM
- Book a meeting in Calendly
- Confirm the redirect goes to the Thank You Page
- Check if the Google Ads Conversion Tag fired successfully
Step 10: Publish the Container of GTM
- Once verified → Click Submit → Publish in GTM
- Your Calendly booking conversion tracking is now live
Step 11: Verify in Google Ads
- Go back to Google Ads → Conversions
- Check the status of your conversion action
- It may show as Unverified at first, but after a few test bookings → it will turn into Recording Conversions
Frequently Asked Questions (FAQ)
Q1. Do I need a paid Calendly plan for Google Ads conversion tracking?
No, you can track conversions with the free version by using GTM and Google Ads.
Q2. Can I set up tracking without a thank you page?
Yes, you can track using Calendly event completion triggers in GTM.
Q3. Why do I need the Conversion Linker tag in GTM?
It ensures proper tracking and attribution for Google Ads conversions.
Q4. How do I verify if the tracking works?
Use Google Tag Assistant and Google Ads Conversion Debugger to test.
Q5. Will enhanced conversions improve my tracking?
Yes, enhanced conversions increase accuracy by sending hashed customer data securely.
Conclusion
By following these steps, you’ve successfully implemented Calendly Booking Conversion Tracking using GTM and validated your data with Google Ads Enhanced Conversions.
This accurate booking data now allows you to confidently optimize ad spend and gain better customer insights.
📞 Ready to scale your results?
For complex GTM configurations, advanced server-side tracking, or custom data-layer solutions:
Need Help?
Hire Me for Setup: WhatsApp Me
Book a Consultation: Schedule a Call
