Introduction
Unbounce landing pages are widely used for lead generation, but accurate form conversion tracking is essential to measure campaign performance. Default tracking methods often miss user data that can improve attribution accuracy.
To solve this, we implement unbounce form conversion tracking google ads using Google Tag Manager and enable Enhanced Conversions to send user data like email and phone number to Google Ads for better conversion matching.
✔ This setup allows you to track:
➜ Unbounce form submissions as Google Ads conversions
➜ Enhanced conversion data (email & phone)
➜ Accurate lead attribution in Google Ads
➜ Data Layer based form tracking via GTM
➜ Reliable conversion measurement for lead campaigns
Prerequisites
Before starting, make sure you have:
✔ Unbounce landing page with a form
✔ Google Tag Manager installed on the page
✔ Access to Google Ads account
✔ Email and phone fields inside the form
✔ Custom Unbounce form listener script
 Need Help?
 Hire Me for Setup: WhatsApp Me
Book a Consultation: Schedule a Call
Step-by-Step Implementation
PART 1 – Verify GTM Installation on Unbounce Page
Step 1: Confirm Google Tag Manager Is Working
Open your Unbounce landing page.
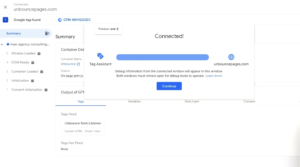
Open Google Tag Manager → Click Preview.
Copy the landing page URL and paste it into the preview connection window → Click Connect.
✔ If preview connects successfully, GTM is installed correctly.
PART 2 – Implement Unbounce Form Listener
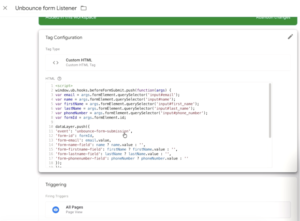
Step 2: Add Unbounce Form Listener Script
Add the custom JavaScript listener code to detect form submission and push the event to the Data Layer.
✔ This listener captures:
➜ Form submission event
➜ Email field value
➜ Name field value
➜ Phone number field
Event names pushed to Data Layer:
- unbounce_form_submission
- unbounce_form_submitted
PART 3 – Test Form Submission Event
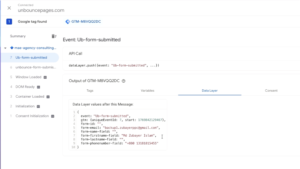
Step 3: Submit Form and Check Data Layer
Submit the form on your Unbounce page.
Open GTM Preview Events panel.
✔ You should see two events:
- unbounce_form_submission
- unbounce_form_submitted
✔ Either event can be used, but in this setup we will use unbounce_form_submitted.
PART 4 – Create GTM Trigger for Form Submission
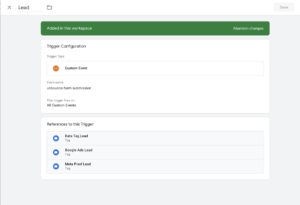
Step 4: Create Custom Event Trigger
Open GTM → Create new trigger.
Trigger Type: Custom Event
Event Name:
unbounce_form_submitted
Trigger Name:
Unbounce Form Submission Trigger
Save the trigger.
PART 5 – Create Variables for Enhanced Conversion Data
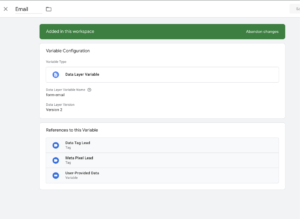
Step 5: Create Email Variable
Create a Data Layer Variable.
Variable Name: form_email
This variable captures the user email address from the form submission.
Step 6: Create Phone Variable
Create another Data Layer Variable.
Variable Name: form_phone
This variable captures the phone number field from the form.
PART 6 – Create Google Ads Conversion Action
Step 7: Create Conversion Goal in Google Ads
Open Google Ads → Create new conversion action.
Conversion Type: Lead
Conversion Name: Unbounce Form Submission
Implementation Method: Google Tag Manager
Save the conversion.
✔ Copy the following values:
- Conversion ID
- Conversion Label

PART 7 – Create GTM Variable for Conversion ID
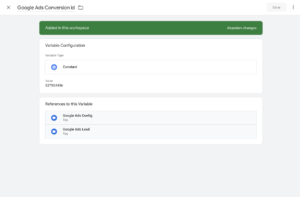
Step 8: Create Conversion ID Constant Variable
Create a Constant Variable in GTM.
Variable Name: Google Ads Conversion ID
Value: AW-XXXXXXXX
Save the variable.
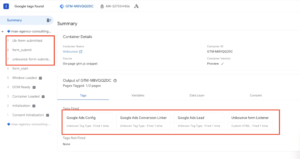
PART 8 – Create Required Google Ads Tags
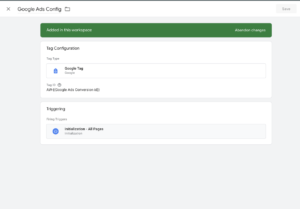
Step 9: Create Google Tag
Create new tag → Tag Type: Google Tag
Add Conversion ID variable.
Trigger: All Pages
Save as: Google Ads Config
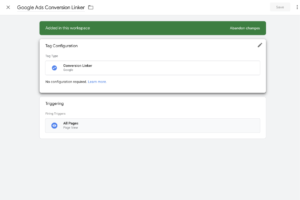
Step 10: Create Conversion Linker Tag
Create another tag → Tag Type: Conversion Linker
Trigger: All Pages
✔ This tag ensures proper attribution for Google Ads conversions.
PART 9 – Create Google Ads Conversion Tracking Tag
Step 11: Create Conversion Tracking Tag
Create a new tag.
Tag Type: Google Ads Conversion Tracking
Add:
Conversion ID
Conversion Label
Trigger: Unbounce Form Submission Trigger
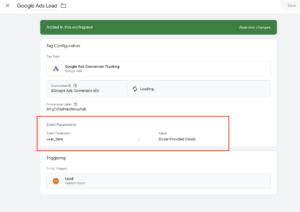
PART 10 – Enable Enhanced Conversions
Step 12: Send User Data for Enhanced Conversions
Inside the conversion tag:
Enable User Data Parameters
Add parameters:
Email → form_email
Phone → form_phone
✔ This allows Google Ads to match conversions more accurately using hashed user data.
Testing Unbounce Form Conversion Tracking
Open GTM Preview Mode → Submit the form again.
✔ Confirm:
➜ Unbounce form event fires
➜ Google Ads conversion tag fires
➜ Email variable captures user email
➜ Phone variable captures phone number
Final Publish Step
Publish the GTM container.
✔ Your Unbounce form conversion tracking with Enhanced Conversions is now active.
Conversions will appear in Google Ads conversion reports.
Frequently Asked Questions
Why enable Enhanced Conversions for Unbounce forms?
Enhanced conversions allow Google Ads to use email and phone data for better attribution accuracy.
Why create Data Layer variables for email and phone?
These variables send user data to Google Ads for enhanced conversion matching.
Do we need conversion value for lead forms?
No. Conversion value is required mainly for ecommerce tracking.
Which event should be used for tracking?
Use unbounce_form_submitted event.
How can we verify Enhanced Conversion data?
Check the variables inside GTM Preview Mode.z
Professional Conclusion
✔ After implementing this setup you now have:
➜ Accurate Unbounce form conversion tracking
➜ Google Ads Enhanced Conversion data
➜ Reliable lead tracking through GTM
➜ Improved attribution for paid campaigns
This setup ensures accurate tracking of Unbounce lead forms in Google Ads.
Need expert help setting up Unbounce From conversion tracking For Google Ads?
Hire Me for Setup: WhatsApp Me
Book a Consultation: Schedule a Call
