Introduction
If you’re running an eCommerce store on Squarespace and want to track purchases and send Enhanced Conversions to Google Ads, this step-by-step guide is for you.
We’ll use Google Tag Manager (GTM) to capture purchase data via a custom data layer on the Order Status Page—and pass this data to Google Ads with Enhanced Conversion tracking. No third-party apps needed.
Prerequisites
Before starting, make sure you have:
-
A Squarespace Ecommerce website
-
Access to the Order Status Page
-
Google Tag Manager container
-
Google Ads Conversion Action with Enhanced Conversions enabled
-
Admin access to Squarespace
🚀 Need Help with Setup?
✅ Hire Me: WhatsApp Me
✅ Book a Consultation: Schedule a Call
Step 1: Add GTM to Your Squarespace Website
-
Go to your Squarespace Dashboard
-
Navigate to:
Website > Pages > Custom Code > Code Injection -
Paste your GTM container code inside the Header field
-
Click Save

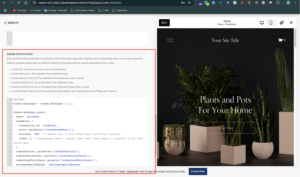
Step 2: Add Purchase Data Layer to the Order Status Page
We’ll push the purchase event into the data layer so GTM can capture it.
-
Still under: Dashboard > Website > Pages > Custom Code > Code Injection
-
Scroll to the Order Status Page section
-
Add the following script:
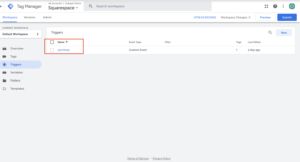
Step 3: Create a Trigger for Purchase Event in GTM
-
Go to GTM → Triggers > New
-
Name it:
Purchase -
Trigger Type: Custom Event
-
Event Name:
purchase -
Fire on: All Custom Events
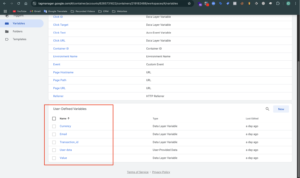
Step 4: Create Data Layer Variables in GTM
We’ll create 5 variables in total:
For the Google Ads Purchase Tag (3 variables):
-
DLV – transaction_id
-
Type: Data Layer Variable
-
Name:
ecommerce.transaction_id
-
-
DLV – value
-
Type: Data Layer Variable
-
Name:
ecommerce.value
-
-
DLV – currency
-
Type: Data Layer Variable
-
Name:
ecommerce.currency
-
For Google Ads Enhanced Conversions (2 variables):
-
DLV – customerEmailAddress
-
Type: Data Layer Variable
-
Name:
customerEmailAddress
-
-
User Data Variable – Email Only
-
Type: Google Ads User-Provided Data
-
Select: Email
-
Set email to:
{{DLV - customerEmailAddress}}
-
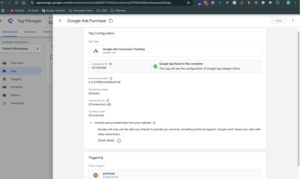
Step 5: Create Google Ads Purchase Conversion Tag
-
Go to GTM → Tags > New
-
Name it:
Google Ads - Purchase Conversion -
Tag Type: Google Ads Conversion Tracking
-
Enter your Conversion ID and Label
-
Enable: “Include user-provided data from your website” ✅
-
Under “User-provided data”, select the User Data Variable – Email Only
-
Set the following:
-
Conversion Value:
{{DLV - value}} -
Transaction ID:
{{DLV - transaction_id}} -
Currency Code:
{{DLV - currency}}
-
-
Trigger:
Purchase Event - Squarespace
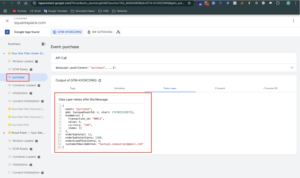
Step 6: Preview & Test
-
In GTM, click Preview
-
Visit your Squarespace store and place a test order
-
On the Order Status Page:
-
Confirm
purchaseevent appears in the Preview Mode -
Check the Console for:
✅ GA4 format dataLayer pushed successfully -
Ensure the Google Ads tag fires correctly
-
Step 7: Publish the GTM Container
-
Click Submit in GTM
-
Add a version name like
Squarespace Purchase Setup -
Click Publish
Step 8: Verify Conversion in Google Ads
-
Go to Google Ads > Tools & Settings > Conversions
-
Find your Purchase Conversion Action
-
Status should show:
-
“No recent conversions” → then
-
“Recording conversions” after data starts coming in
-

Conclusion
You’ve successfully tracked purchase events from Squarespace to Google Ads using GTM and Enhanced Conversions!
This ensures:
✅ Better match rates
✅ More accurate attribution
✅ Optimized campaign performance
📢 Need Help?
🧠 Want me to set it up for you?
✅ Hire Me: WhatsApp Me
✅ Book a Free Consultation: zcal.co/zubayerislam01/consultation
For more insightful guides and tips on conversion tracking and digital marketing, check out my other Blogs Here
