Quick Answer
WooCommerce conversion tracking with GTM and GA4 means pushing every completed purchase — including order value, transaction ID, currency, and product items — from your WordPress WooCommerce store into Google Analytics 4 using the GTM4WP plugin’s ecommerce Data Layer and Google Tag Manager. Specifically, you set this up by installing the GTM4WP plugin to connect GTM with WordPress, enabling WooCommerce ecommerce integration to push structured purchase data into the Data Layer, and then creating a GA4 purchase event tag in GTM that reads those values and fires on the order confirmation page. As a result, accurate purchase data flows into GA4 in real time — giving you measurable revenue, product performance data, and the purchase signals Google Ads Smart Bidding needs to optimise toward real buyers instead of clicks.
Key Takeaways
✅ WooCommerce does not send purchase data to GA4 automatically — therefore, you need the GTM4WP plugin to enable the WooCommerce ecommerce Data Layer that pushes order value, transaction ID, currency, and product items into Google Tag Manager on every completed purchase, which then routes that structured data to GA4.
✅ The GTM4WP plugin handles the entire WooCommerce side of the setup — specifically, enabling WooCommerce integration pushes a complete purchase event to the Data Layer including customer email, order totals, and hashed user identifiers that are essential for Google Ads Enhanced Conversions.
✅ Three Data Layer variables are the absolute minimum for a working GA4 purchase tag: ecommerce.value, ecommerce.currency, and ecommerce.transaction_id — because without all three, purchase events will be incomplete, duplicate conversions will inflate your Google Ads data, and ROAS becomes unmeasurable.
✅ Always validate the complete purchase flow in GTM Preview Mode before publishing — in other words, confirm the purchase event fires on the thank you page, all Data Layer variables are populated with correct values, and GA4 DebugView shows the correct transaction ID and value matching your WooCommerce order.
Introduction
Running a WooCommerce store without proper GA4 purchase tracking means every marketing decision is made without revenue data. You can see traffic and sessions — however, without purchase events flowing into Google Analytics 4, you have no idea which campaigns, channels, or products actually generate sales.
As a result, the budget gets allocated to channels that look active but never convert. Moreover, there is no way to prove ROI on any advertising spend.
As a Stape Certified Partner and Marketing Attribution Specialist, I have built this exact infrastructure for WooCommerce stores across multiple industries. Therefore, this guide covers the complete setup — GTM4WP plugin, WooCommerce ecommerce Data Layer, GA4 purchase tag, and GA4 DebugView verification — so your store’s revenue flows accurately into Google Analytics 4 from every completed order.
🎥 Watch Now
Figure 1: Complete Guide: WooCommerce Conversion Tracking with GTM & GA4 | Google Analytics 4 Tutorial 2025
What Is WooCommerce Conversion Tracking with GTM & GA4?
WooCommerce conversion tracking with GTM and GA4 is the process of capturing every completed purchase on your WordPress WooCommerce store and sending that purchase data — order total, transaction ID, currency, and product details — into Google Analytics 4 as a structured ecommerce purchase event.
Google Tag Manager acts as the bridge between WooCommerce and GA4. Specifically, the GTM4WP plugin pushes WooCommerce order data into the browser’s Data Layer on every completed purchase. GTM then reads those Data Layer values and fires a GA4 tag that sends the purchase event to your Analytics property. As a result, every completed order becomes a measurable conversion with full revenue attribution.
For a deeper understanding of how GA4 ecommerce tracking works at the tag level, refer to the GA4 Ecommerce Tracking Setup Guide from Google’s official developer documentation.
Why WooCommerce GA4 Purchase Tracking Matters
Most WooCommerce store owners install GA4 and assume purchase data flows automatically. However, it does not. Without the WooCommerce ecommerce Data Layer, GA4 only sees page views and sessions — consequently, the actual purchases that represent real business revenue remain invisible.
Without proper WooCommerce GA4 tracking, these problems occur:
- GA4 shows zero purchase events despite real orders completing every day
- No revenue data to calculate campaign ROAS or identify top-performing products
- Google Ads Smart Bidding optimises toward page views — not purchases
- Enhanced Conversions cannot fire without customer data from the order
- Duplicate conversions inflate your Google Ads count when no transaction ID is present
On the other hand, when you implement proper tracking, the results are significant:
- Every completed order fires a purchase event with full revenue data in GA4
- GA4 ecommerce reports show revenue by product, category, and traffic source
- Google Ads Smart Bidding receives real purchase signals — therefore, cost per acquisition decreases
- Enhanced Conversions become possible using hashed customer email from order data
- Furthermore, duplicate conversions are eliminated via unique transaction IDs
How the System Works — Complete Data Flow
Before building the setup, it is important to understand exactly what this architecture creates. In other words, this is a five-step attribution bridge from purchase completion to GA4 reporting.
Figure 2: Complete Data Flow — WooCommerce Purchase Event Through GTM4WP Data Layer to GA4.
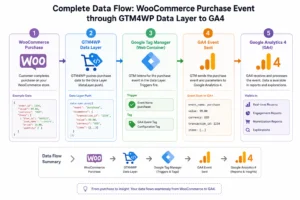
- Step 1 — First, the customer completes a purchase on your WooCommerce store. Subsequently, WooCommerce processes the order and redirects to the thank you page.
- Step 2 — Next, the GTM4WP plugin detects the completed order. It then pushes a structured purchase event to the Data Layer including order value, transaction ID, currency, customer email, and the full product items array.
- Step 3 — Google Tag Manager fires on the page. As a result, it detects the purchase Data Layer push and triggers all tags configured to fire on that event.
- Step 4 — Subsequently, the GA4 purchase tag reads ecommerce.value, ecommerce.currency, ecommerce.transaction_id, and ecommerce.items and sends a structured purchase event to your GA4 property.
- Step 5 — Finally, GA4 receives the purchase event. The data appears in GA4 DebugView in real time and populates ecommerce reports within 24–48 hours.
Prerequisites
Before starting, make sure the following are in place:
- WordPress website with WooCommerce installed and active
- Google Tag Manager account with a container created for your store domain
- GA4 property created with a Measurement ID ready (format: G-XXXXXXXXXX)
- Admin access to your WordPress dashboard to install plugins
- GTM Preview Mode and GA4 DebugView access for testing
- Basic familiarity with GTM tags, triggers, and variables
- Stape.io account if planning to add server-side tracking to improve conversion coverage
IMPORTANT: This setup uses the free GTM4WP plugin. However, if your store uses a custom checkout flow or heavily modified thank you page, your Data Layer variable values may differ. Therefore, always verify in GTM Preview Mode with a real test purchase before publishing.
Step-by-Step Implementation
Step 1: Install and Configure the GTM4WP Plugin
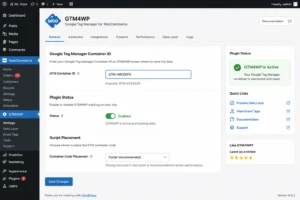
To begin, go to your WordPress dashboard → Plugins → Add New. Search for GTM4WP (GTM for WP). Install and activate the plugin. Then, go to Settings → Google Tag Manager for WordPress. Paste your GTM container ID (format: GTM-XXXXXXX) and click Save Changes.
CRITICAL: After saving, the plugin status defaults to OFF. Therefore, you must toggle the status to ON and save again. This is specifically the most common reason GTM appears connected in Preview Mode but does not fire on the live site.
Figure 3: GTM4WP Plugin Settings in WordPress Dashboard — Container ID Field and Status Toggle ON
Step 2: Enable the WooCommerce Ecommerce Data Layer
Next, go to GTM4WP plugin settings → Integrations tab → WooCommerce section. Enable all three options:
- Track E-Commerce → ON
- Customer data in Data Layer → ON
- Order data in Data Layer → ON
Click Save Changes. As a result, these settings push complete WooCommerce order data into the Data Layer — including customer email for Enhanced Conversions, order totals, and the full product items array — on every ecommerce event.
Figure 4: GTM4WP WooCommerce Integration Settings — Track Ecommerce, Customer Data, and Order Data Enabled

Step 3: Verify the Data Layer in GTM Preview Mode
Before building any tags, first verify the WooCommerce ecommerce Data Layer is pushing correctly. Specifically, go to GTM → Workspace → Preview, enter your store URL, and connect. Then, complete a full test purchase. On the order confirmation page, expand the Data Layer tab and confirm:
- value — populated with a numeric order value
- currency — populated with your currency code (e.g. USD, BDT)
- transaction_id — populated with a unique order ID string
- items — populated with an array of product objects
For reference on the correct GA4 ecommerce event structure, see Google’s GA4 ecommerce developer documentation which outlines the required and recommended parameters for the purchase event.
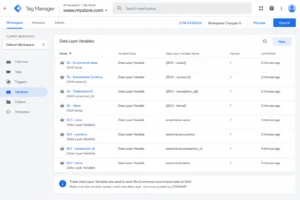
Step 4: Create GA4 Data Layer Variables in GTM
In GTM, go to Variables → New → Data Layer Variable. Specifically, create four variables and set each to Data Layer Version 2:
| Variable Name | Data Layer Key |
| dlv_ecommerce_value | ecommerce.value |
| dlv_ecommerce_currency | ecommerce.currency |
| dlv_transaction_id | ecommerce.transaction_id |
| dlv_ecommerce_items | ecommerce.items |
Figure 5: GTM Data Layer Variables — WooCommerce Ecommerce Value, Currency, Transaction ID, and Items Configured
Step 5: Create the GA4 Configuration Tag
In GTM, go to Tags → New → Google Tag. Enter your GA4 Measurement ID (G-XXXXXXXXXX). Under Configuration Settings, add: send_page_view → true. Set the trigger to Initialization — All Pages and name the tag GA4 Config. This tag initialises GA4 on every page of your store.
Step 6: Create the GA4 Purchase Event Tag
In GTM, go to Tags → New → Google Analytics: GA4 Event. Set the Configuration Tag to GA4 Config and the Event Name to purchase — lowercase, no spaces.
Under Event Parameters, add the following four parameters:
| Parameter Name | Value |
| value | {{dlv_ecommerce_value}} |
| currency | {{dlv_ecommerce_currency}} |
| transaction_id | {{dlv_transaction_id}} |
| items | {{dlv_ecommerce_items}} |
Additionally, enable Include user-provided data from your website → Automatic. This enables Enhanced Conversions using hashed customer email from the order. Then, create the trigger: Triggers → New → Custom Event → event name: purchase → name: CE — WooCommerce Purchase.
CRITICAL: Use a Custom Event trigger — NOT a Page View trigger on the thank you page URL. Specifically, a Page View trigger fires on every page load including refreshes — consequently creating duplicate purchase events. In contrast, the Custom Event trigger fires exactly once per Data Layer push per completed order.
Figure 6: GTM GA4 Purchase Event Tag — Event Name, Parameters, and Custom Event Trigger Configuration
![]()
Step 7: Test the Complete Purchase Flow in GTM Preview
Return to GTM Preview and complete a full real test purchase from product page through checkout to the order confirmation page. On the thank you page, confirm:
- purchase custom event appears in the event list
- All four Data Layer variables are populated with correct values
- GA4 — WooCommerce Purchase tag shows as Fired
CHECK: If any variable shows undefined, the Data Layer key format is wrong. Specifically, use dot notation: ecommerce.value — not value alone, not ecommerce_value with an underscore. Therefore, fix the variable key before publishing.
Step 8: Verify in GA4 DebugView and Publish
In GA4 → Admin → DebugView, confirm the purchase event appears with the correct value, transaction_id, and currency. Once verified, go to GTM → Submit → name the version WooCommerce GA4 Purchase Tracking Setup → Publish. As a result, your WooCommerce purchase tracking is now live on every completed order.
Basic vs Full WooCommerce GA4 Tracking — Comparison
| Feature | Basic (No Data Layer) | Full Setup (GTM4WP + GA4) |
| Purchase events tracked | ❌ None | ✅ Every completed order |
| Revenue data in GA4 | ❌ Not available | ✅ Full order value |
| Transaction ID | ❌ Missing | ✅ Unique WooCommerce order ID |
| Product items array | ❌ Not available | ✅ Full items with price + qty |
| Enhanced Conversions | ❌ No | ✅ Yes — via hashed email |
| Duplicate conversions | ❌ Common | ✅ Prevented via transaction_id |
| Smart Bidding signal | ❌ Page views only | ✅ Real purchase revenue events |
| GA4 ecommerce reports | ❌ Empty | ✅ Revenue, products, categories |
| ROAS measurable | ❌ Impossible | ✅ Per campaign + keyword |
| Server-side ready | ❌ No foundation | ✅ Clean Data Layer foundation |
Real Use Case — WooCommerce Store Running Google Ads
To illustrate the impact of proper tracking, consider this example. A WooCommerce clothing store had been running Google Shopping campaigns for 3 months with zero purchase data in GA4. Although Google Ads reported conversions, there were no transaction IDs — as a result, duplicate page view triggers inflated the conversion count by an estimated 45%.
Before setup:
- GA4 purchase events: 0 — despite 180+ monthly orders completing
- Google Ads conversion count inflated — consequently, no reliable purchase signal for bidding
- No product-level revenue data — therefore, impossible to identify top-performing SKUs
- ROAS: completely unmeasurable
After implementing WooCommerce GA4 tracking with GTM4WP — 45 days:
- 100% of purchases tracked accurately with full revenue data in GA4
- GA4 ecommerce reports revealed 3 products generating 62% of total revenue
- Google Ads Smart Bidding shifted to Target ROAS — consequently, cost per purchase dropped 28% within 45 days
- Meta Pixel purchase event quality improved from Low to High
- As a result, measured ROAS reached 2x within the first 30 days of data-driven bidding
Tools Used
| Tool | Purpose |
| GTM4WP Plugin | Connects GTM to WordPress — enables WooCommerce ecommerce Data Layer |
| Google Tag Manager | Reads Data Layer variables, manages tags, fires GA4 purchase tag |
| Google Analytics 4 | Receives purchase events, populates ecommerce reports, DebugView testing |
| WooCommerce | WordPress ecommerce platform — order processing, thank you page |
| GA4 DebugView | Real-time purchase event verification during testing |
| GTM Preview Mode | Validates Data Layer events and tag firing before publishing |
| Stape.io | GTM server container hosting for future server-side tracking |
Common Mistakes
Mistake 1 — GTM Container Toggle Left OFF After Saving
After entering your GTM container ID in the GTM4WP plugin and saving, the plugin status silently defaults to OFF. As a result, this is the most common reason GTM appears connected in Preview Mode but does not fire on the live production site. Therefore, always check the plugin status toggle after every save — specifically, set it to ON and save again before testing.
Mistake 2 — Using Page View Trigger Instead of Custom Event Trigger
Triggering the GA4 purchase tag on “Page URL contains /order-received” fires on every page load — including refreshes, bookmarks, and email link clicks. Consequently, one real purchase becomes 3–5 duplicate conversion events in GA4 and Google Ads. To avoid this, always use a Custom Event trigger set to fire on the purchase event name — because this fires exactly once per Data Layer push per completed order.
Mistake 3 — Wrong Data Layer Variable Key Format
Data Layer variable keys must use exact dot notation: ecommerce.value — not value alone, not ecommerce_value with an underscore. Specifically, one incorrect character returns undefined in GTM Preview, which means your purchase tag sends empty values to GA4. Therefore, always verify all four variable values are populated in GTM Preview before publishing.
Mistake 4 — Not Testing a Real Full Purchase Before Publishing
The WooCommerce purchase event only fires on the order confirmation page after a real order is placed with real payment. In other words, simulated browsing in GTM Preview is not sufficient validation. Therefore, always complete at least one full test purchase — with real customer information — and confirm the purchase event appears in GA4 DebugView with correct values before publishing.
Advanced Optimization Strategies
Tips 1: Track Shipping and Tax Parameters for Accurate Revenue Reporting
Send the shipping and tax parameters for complete ecommerce revenue matching. The GTM4WP plugin pushes ecommerce.shipping and ecommerce.tax to the Data Layer alongside the order total. Creating dedicated Data Layer variables for these values and passing them into your GA4 purchase tag helps align GA4 revenue reporting with WooCommerce order totals more accurately.
Tips 2: Enable Google Ads Enhanced Conversions with GTM4WP Customer Data
Use the hashed customer data from GTM4WP for Google Ads Enhanced Conversions. When Customer Data is enabled in the GTM4WP WooCommerce integration, the plugin pushes hashed email and phone values into the Data Layer with every purchase. Passing these values into your Google Ads Conversion tag improves attribution accuracy and helps recover conversions lost due to browser privacy restrictions. For more detail, refer to the Enhanced Conversions for Web documentation from Google Ads support.
Tips 3: Create a GA4 Purchaser Audience for Campaign Exclusions
Create a GA4 purchaser audience after purchase tracking is fully validated. Build an audience of recent buyers based on purchase events and exclude them from prospecting campaigns in Google Ads. This reduces wasted ad spend and shifts budget toward acquiring new customers.
Tips 4: Validate the Ecommerce Items Array Before Publishing
Validate the ecommerce.items array structure before publishing your GTM container. The array should include required parameters such as item_id, item_name, price, and quantity. In GTM Preview mode, inspect the purchase event inside the Data Layer tab and confirm the items array is populated correctly.
Tips 5: Use Server-Side Tracking to Reduce Data Loss
Set up a Stape.io server container to protect purchase tracking from browser-side blocking. Browser privacy tools and ad blockers often prevent GA4 browser events from firing consistently. Therefore, routing purchase tracking through a GTM server container via Stape improves data reliability and helps preserve attribution accuracy.
Frequently Asked Questions
How do I set up WooCommerce conversion tracking in GA4?
First, install the GTM4WP plugin in WordPress, enter your GTM container ID, and ensure the toggle is ON. Then, enable WooCommerce integration — specifically, turn on track ecommerce, customer data, and order data. Next, in Google Tag Manager, create four Data Layer variables for ecommerce.value, ecommerce.currency, ecommerce.transaction_id, and ecommerce.items. After that, create a GA4 Event tag with event name “purchase” triggered by a Custom Event trigger. Finally, test by completing a full real purchase and verify in GA4 DebugView before publishing.
Why is my WooCommerce purchase event not showing in GA4?
The most common causes are: the GTM4WP plugin toggle is set to OFF after saving, or the GA4 purchase tag uses a Page View trigger instead of a Custom Event trigger. Additionally, the GTM container ID may be entered incorrectly, or the GA4 Measurement ID does not match the property you are checking. Therefore, open GTM Preview Mode, complete a real test purchase, and check whether all four Data Layer variables are populated — because any undefined variable means the configuration needs correcting.
What Data Layer variables do I need for WooCommerce GA4 purchase tracking?
The minimum required are: ecommerce.value (order total), ecommerce.currency (currency code), and ecommerce.transaction_id (WooCommerce order number). However, for complete GA4 ecommerce tracking, you should also pass ecommerce.items, ecommerce.shipping, and ecommerce.tax. For the full list of GA4 ecommerce parameters, refer to Google’s GA4 ecommerce developer guide.
Does the GTM4WP plugin work with all WooCommerce themes?
Generally, yes — the GTM4WP plugin uses WooCommerce hooks rather than theme-specific code, making it compatible with Elementor, Divi, Astra, and GeneratePress. However, custom checkout flows or heavily modified thank you pages may affect when the purchase event fires. Therefore, always verify by completing a real test purchase in GTM Preview Mode before publishing.
Can I use this setup for Google Ads conversion tracking as well?
Yes — once the WooCommerce purchase event flows through GTM, you can fire both a GA4 Event tag and a Google Ads Conversion tag from the same Custom Event trigger. Additionally, you can pass hashed customer email from GTM4WP to enable Enhanced Conversions — which typically recovers 15–25% of otherwise untracked conversions. For technical details, see the Google Ads conversion tracking overview from Google’s developer documentation.
Should I use server-side tracking for WooCommerce GA4?
Browser-side tracking through GTM4WP and GA4 is sufficient for most WooCommerce stores as a starting point. However, ad blockers and iOS privacy restrictions can block browser-side GA4 tags — consequently losing 15–30% of purchase events. Therefore, routing GA4 purchase events through a server-side GTM container hosted on Stape.io ensures every purchase is captured regardless of browser settings. Furthermore, the browser-side Data Layer setup in this guide is the exact foundation server-side tracking requires — so no rework is needed when you are ready to add the server layer.
Conclusion
In summary, WooCommerce conversion tracking with GTM and GA4 gives your store the revenue data it needs to make real marketing decisions. Because the GTM4WP plugin handles the WooCommerce Data Layer automatically, every completed purchase flows into GA4 with full order value, transaction ID, currency, and product data once the setup is configured correctly.
As a result, you can measure actual ROAS, identify your highest-revenue products, eliminate duplicate conversions in Google Ads, and give Smart Bidding the purchase signals it needs to optimise toward real buyers. Ultimately, accurate tracking is the foundation every scaling decision depends on.
Related Posts
- Full Funnel Tracking for Google Ads with CRM, GTM & Stape (2026)
- Google Ads Server-Side Tracking with GTM & Stape (Complete Setup Guide 2026)
- WPForms Conversion Tracking with GA4 & GTM (Complete Setup Guide 2026)
Ready to Fix Your WooCommerce Tracking?
If your WooCommerce store is running ads without purchase data in GA4 and Google Ads, every campaign decision you make is based on incomplete information. As a result, budget is wasted and scaling becomes impossible to justify with data.
