Introduction
Modern browsers and ad blockers are reducing the reliability of traditional Meta Pixel tracking, causing incomplete conversion reporting and inaccurate attribution.
To solve this, you need a hybrid tracking setup: Meta Pixel (Browser) + Facebook Conversion API (Server-Side) implemented using Google Tag Manager (GTM) and Stape.io.
In this complete 2026 guide, you’ll learn how to properly track Unbounce form submissions (Lead events) with:
- Advanced matching
- Server-side data forwarding
- Proper event deduplication
- Maximum tracking accuracy
Prerequisites
Before starting, make sure you have:
✔ Unbounce landing page with a form
✔ Google Tag Manager (Web container installed)
✔ GTM Server container created
✔ Stape.io server container ready
✔ Meta Pixel created
✔ Meta Conversion API Access Token
✔ Meta Test Event ID
✔ Form submission listener configured in GTM
 Need Help?
 Hire Me for Setup: WhatsApp Me
Book a Consultation: Schedule a Call
Step-by-Step Implementation Meta Pixel & Conversion API Setup for Unbounce Forms
PART 1 – Browser Tracking (Meta Pixel via Web GTM)
Step 1: Verify Google Tag Manager Is Working
Open GTM → Click Preview → Connect to your Unbounce page.
If you see “Connected”, GTM is firing correctly.
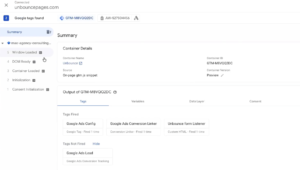
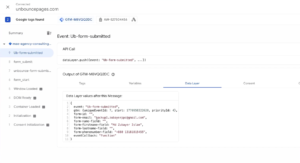
Step 2: Confirm Form Listener Is Working
In GTM Preview Mode, submit your form.
You should see:
- Custom event firing
- Email captured
- Phone captured
- Name captured
If data appears in Data Layer, the listener is working correctly.
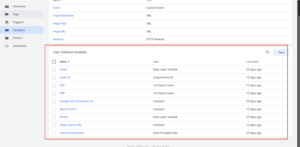
Step 3: Create Required Variables (Web Container)
You need to set up several variables in your Web Container to capture and send data accurately.
Create the following:
- Meta Pixel ID: (Type: Constant) → Value: Your Pixel ID
- Unique Event ID: (Use GTM Template Gallery) → Used for deduplication.
- FBP (Browser ID): (Type: First-Party Cookie) → Cookie Name: _fbp
- FBC (Click ID): (Type: First-Party Cookie) → Cookie Name: _fbc
- Email Variable: (Type: Data Layer Variable) → Pull from listener.
- Phone Variable: (Type: Data Layer Variable) → Pull from listener.
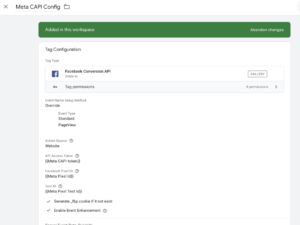
Step 4: Create Meta Pixel Tags
A) PageView Tag
Template: Facebook Pixel
Pixel ID: {{Meta Pixel ID}}
Event Type: PageView
Parameters: Event ID, fbp, fbc
Trigger: All Pages (Initialization)
Save as: Meta Pixel Config
![]()
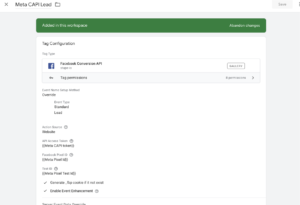
B) Lead Tag
Duplicate the PageView tag and modify the following:
Event Type: Lead
Advanced Matching: Add Email and Phone variables.
Trigger: Unbounce Form Submission
Save as: Meta Pixel Lead
![]()
Step 5: Test Browser Pixel
Go to Meta Events Manager → Test Events.
Reload your page → PageView event should fire.
Submit the form → Lead event should fire.
If both appear, browser tracking is working correctly.
PART 2 – Send Data to Server via Stape
Step 6: Create Stape Server Container
In your Stape.io account, create a new server container with the following settings:
- Name it: Unbounce (keep names project-specific for easy management)
- Setup method: Manual
- Once created, copy the Server Container URL
- Go to GTM > Server Container > Admin > Container Settings
- Paste the URL and save
Step 7: Create Stape Server URL Variable (Web Container)
Create a new Constant variable in your Web container:
- Type: Constant
- Name: Stape Server URL
- Value: Your Stape server domain URL
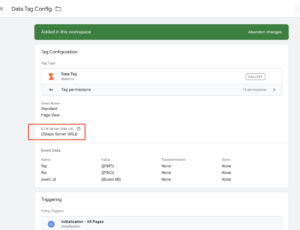
Step 8: Create Stape Data Tags
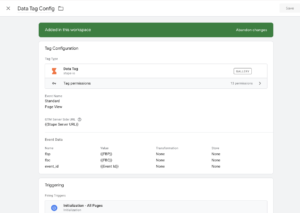
A) PageView Data Tag
Template: Stape Data Tag
Server URL: {{Stape Server URL}}
Event Name: PageView
Parameters: fbp, fbc, Event ID
Trigger: All Pages (Initialization)
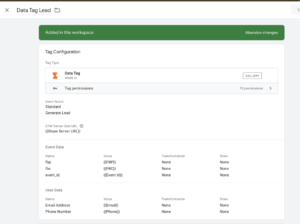
B) Lead Data Tag
Duplicate the above tag and modify:
Event Name: generate_lead
Parameters: fbp, fbc, Event ID, Email, Phone
Trigger: Unbounce Form Submission
PART 3 – Server Container Setup (Meta CAPI)
Step 9: Import Stape Data Client
Switch to your Server Container:
- Go to Clients.
- Import the Stape Data Client template from the gallery.
- Create the client.
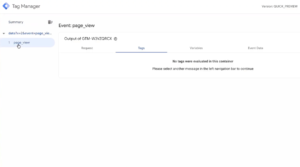
- Run Preview mode to confirm PageView hits are appearing in the server.
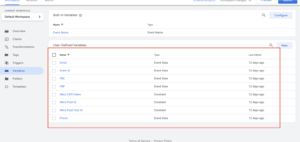
Step 10: Create Server Variables
Create the following Constant Variables in your Server Container:
- Meta CAPI Token *
- Meta Pixel ID
- Meta Pixel Test ID
Step 11: Create Meta CAPI PageView Tag
- Template: Facebook Conversion API (by Stape)
- Pixel ID: {{Meta Pixel ID}}
- API Token: {{Meta CAPI Token}}
- Test Event Code: {{Meta Pixel Test ID}}
- Parameters: Event ID → Event Data, fbp → Event Data, fbc → Event Data
- Trigger: All Pages
- Save as: Meta CAPI Config
Step 12: Create Meta CAPI Lead Tag
Duplicate the Config tag and modify:
- Event Name: Lead
- Parameters to Add: Email → Event Data, Phone → Event Data
- Trigger: generate_lead
- Save as: Meta CAPI Lead
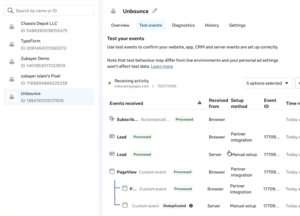
Testing & Deduplication Verification
- Open Preview Mode for both your Server container and Web container.
- Reload your Unbounce page → Confirm PageView fires on both Web and Server.
- Submit the form → Confirm Lead fires on both Web and Server.
- Go to Meta Test Events.
- Confirm both Browser & Server events appear.
- Crucial: Click into the event and confirm the Event ID is identical for both.
- Same Event ID = Proper deduplication ✅
Final Publish Step
Once verified, hit Publish on both your Web container and Server container. Your Meta tracking is now fully live!
Frequently Asked Questions
• Why use Meta Pixel & Conversion API Setup for Unbounce Forms?
To reduce tracking loss caused by ad blockers and browser privacy restrictions, ensuring more reliable and accurate conversion reporting.
• Why must the Event ID match?
The Event ID must match to allow Meta to properly deduplicate browser and server events and prevent double-counting in reporting.
• Can I track Purchase events the same way?
Yes, the same structure can be replicated for Purchase events or any other standard and custom events.
• Does this improve Event Match Quality?
Yes, sending advanced matching parameters such as email and phone significantly improves Event Match Quality and attribution accuracy.
• Is this future-proof?
Yes, server-side tracking through Conversion API is a long-term solution designed to remain stable despite evolving browser and privacy restrictions.
Professional Conclusion
By implementing this complete setup, you now have:
- Browser + Server hybrid tracking
- Advanced Matching enabled
- Proper event deduplication
- High-quality Meta Ads data
- Protection against ad blockers
This setup ensures maximum reliability and accurate Lead attribution for your Unbounce landing pages in 2026 and beyond.
Need expert help with Meta Pixel & Conversion API setup for Unbounce?
Hire Me for Setup: WhatsApp Me
Book a Consultation: Schedule a Call
