Introduction
Accurate Meta Pixel Conversion API Setup for Unbounce is critical for modern lead generation as browser restrictions, iOS privacy updates, and ad blockers continue to break traditional tracking. Many advertisers relying only on browser tracking face data loss, poor attribution, and underreported conversions—directly impacting campaign performance and scaling.
As a Stape Certified Partner, I’ve implemented Unbounce Facebook conversion tracking and Facebook Pixel and Conversion API Setup Unbounce for multiple businesses and agencies—and this guide shows you how to set it up correctly. By combining browser and server-side tracking using GTM and Stape, you can recover lost data, improve match quality, and ensure reliable attribution.
➡️ Google Tag Manager enables scalable tracking across both environments.
To improve attribution further, explore Google Ads server-side tracking with GTM & Stape (Complete Guide 2026) and Full Funnel Tracking for Lead Generation using GTM & Server-Side Tracking. In this guide, you’ll learn how to implement a complete tracking system for Unbounce forms and improve Meta Ads performance with reliable data.
🎥 Watch Now
Figure: Unbounce Meta Tracking Architecture
Meta Pixel Conversion API Setup for Unbounce is a hybrid tracking framework that combines browser-side tracking (Meta Pixel) with server-side tracking (Conversion API). This approach ensures that all form submissions from your Unbounce landing pages are captured accurately and sent to Meta Ads, even when browser tracking fails.
Unlike traditional setups, this system uses first-party data and server communication to bypass browser limitations. As a result, it improves data reliability, enhances attribution accuracy, and enables better campaign optimization.
Why Is It Important?
Without a proper tracking system, your Unbounce lead data becomes incomplete and unreliable. However, implementing unbounce facebook conversions integration with server-side tracking solves this issue.
• Captures more conversions than browser-only tracking
• Improves Meta Ads attribution accuracy
• Reduces data loss caused by privacy restrictions
• Enables advanced meta ads server side tracking unbounce stape
• Helps optimize campaigns based on real data
➡️ For advanced attribution, explore Google Ads Offline Conversion Tracking with CRM (Complete Guide 2026)
Quick Answer
Meta Pixel Conversion API Setup for Unbounce combines browser and server-side tracking to capture form submissions and send accurate data to Meta Ads. As a result, it improves tracking reliability, reduces data loss, and ensures proper deduplication using Event ID for better attribution and campaign performance.
Key Takeaways
- Combining Meta Pixel browser tracking with Conversion API server-side tracking ensures Unbounce form submissions are captured accurately even when browser restrictions, ad blockers or iOS privacy settings prevent pixel events from firing.
- Google Tag Manager provides a flexible, no-code way to implement both browser-side pixel tags and server-side Conversion API tags for Unbounce landing pages without modifying the page source code.
- Using Event ID for deduplication between browser and server events prevents Meta from counting the same lead twice — ensuring your conversion numbers are accurate and your campaigns optimize on clean data.
- Sending hashed email and phone data with every Lead event improves Event Match Quality score in Meta Events Manager, which directly strengthens attribution and improves Meta Ads targeting and optimization signals.
Tools Used in This Setup
- Unbounce Landing Pages
- Meta Pixel
- Conversion API
- Google Tag Manager (Web + Server)
- Google Analytics 4
- Data Layer
- Custom JavaScript Listener
- stape.io
How the System Works
First, a user submits a form on your Unbounce page.
Then, Meta Pixel captures the event in the browser.
Meanwhile, GTM sends the same event data to the server container via Stape.
After that, Conversion API sends server-side events directly to Meta.
Finally, Event ID ensures deduplication between browser and server events.
As a result, your tracking remains accurate, consistent, and resistant to data loss.
Why It Matters
Relying only on browser tracking leads to incomplete and unreliable data. However, combining Pixel and Conversion API ensures accurate tracking even when browser data is blocked. As a result, Meta Ads receives stronger optimization signals, improves targeting, and increases campaign profitability. In addition, businesses gain clear visibility into real lead performance and can scale campaigns confidently.
Prerequisites
✔ Unbounce landing page with form
✔ GTM Web & Server containers
✔ Meta Pixel ID & Conversion API Token
✔ Data Layer listener script
✔ Stape server container setup
New to GTM? Start with the official Google Tag Manager setup guide here.
Step-by-Step Implementation for Meta Pixel Conversion API Setup for Unbounce
PART 1 – Browser Tracking (Meta Pixel via Web GTM)
Step 1: Verify Google Tag Manager Is Working
Open GTM → Click Preview → Connect to your Unbounce page.
If you see “Connected”, GTM is firing correctly.
Figure 1: GTM preview connected on unbounce page for meta pixel tracking
Step 2: Confirm Form Listener Is Working
In GTM Preview Mode:
Submit your form.
You should see:
- Custom event firing
- Email captured
- Phone captured
- Name captured
If data appears in Data Layer → Listener is working correctly.
Figure 2: Unbounce form submission event showing data layer email phone captured

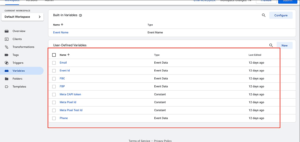
Step 3: Create Required Variables (Web Container)
You need to set up several variables in your Web Container to capture and send data accurately.
Create the following:
- Meta Pixel ID: (Type: Constant) → Value: Your Pixel ID
- Unique Event ID: (Use GTM Template Gallery) → Used for deduplication.
- FBP (Browser ID): (Type: First-Party Cookie) → Cookie Name: _fbp
- FBC (Click ID): (Type: First-Party Cookie) → Cookie Name: _fbc
- Email Variable: (Type: Data Layer Variable) → Pull from listener.
- Phone Variable: (Type: Data Layer Variable) → Pull from listener.
Figure 3: GTM variables setup for meta pixel conversion api unbounce tracking
Step 4: Create Meta Pixel Tags
A) PageView Tag
Template: Facebook Pixel
Pixel ID: {{Meta Pixel ID}}
Event Type: PageView
Parameters: Event ID, fbp, fbc
Trigger: All Pages (Initialization)
Save as: Meta Pixel Config
Figure 4: Meta pixel pageview tag setup in gtm for unbounce tracking
![]()
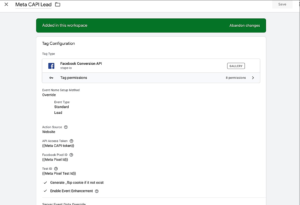
B) Lead Tag
Duplicate the PageView tag and modify the following:
Event Type: Lead
Advanced Matching: Add Email and Phone variables.
Trigger: Unbounce Form Submission
Save as: Meta Pixel Lead
Figure 5: Meta pixel lead event setup unbounce form tracking gtm
![]()
Step 5: Test Browser Pixel
Go to Meta Events Manager → Test Events.
Reload your page → The PageView event should fire.
Submit the form → The Lead event should fire.
If both appear, your browser tracking is successfully working!
PART 2 – Send Data to Server via Stape
Step 6: Create Stape Server Container
In your Stape.io account, create a new server container with the following settings:
- Name it: Unbounce (keep names project-specific for easy management)
- Setup method: Manual
- Once created, copy the Server Container URL
- Go to GTM > Server Container > Admin > Container Settings
- Paste the URL and save
Figure 6: Stape server container url setup for unbounce conversion api tracking
Step 7: Create Stape Server URL Variable (Web Container)
Create a new Constant variable in your web container:
- Type: Constant
- Name: Stape Server URL
- Value: Your Stape server domain URL
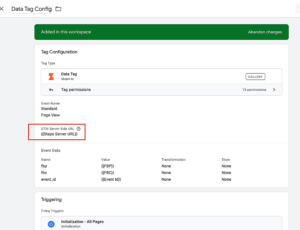
Step 8: Create Stape Data Tags
A) PageView Data Tag
Template: Stape Data Tag
Server URL: {{Stape Server URL}}
Event Name: PageView
Parameters: fbp, fbc, Event ID
Trigger: All Pages (Initialization)
Figure 7: Stape data tag pageview setup unbounce server side tracking
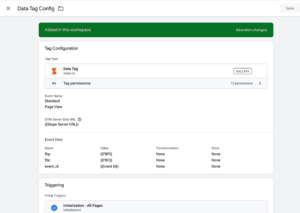
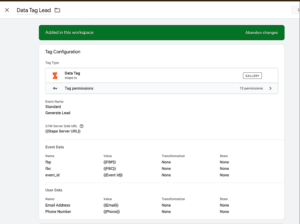
B) Lead Data Tag
Duplicate the above tag and modify:
Event Name: generate_lead
Parameters: fbp, fbc, Event ID, Email, Phone
Trigger: Unbounce Form Submission
Figure 8: Stape lead data tag unbounce form submission server tracking
PART 3 – Server Container Setup (Meta CAPI)
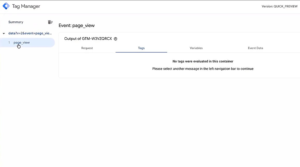
Step 9: Import Stape Data Client
Switch to your Server Container:
- Go to Clients.
- Import the Stape Data Client template from the gallery.
- Create the client.
- Run Preview mode to confirm PageView hits are appearing in the server.
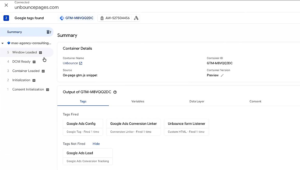
Figure 9: GTM server container receiving data from unbounce events
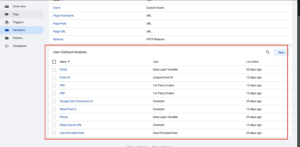
Step 10: Create Server Variables
Create the following Constant Variables in your Server Container:
- Meta CAPI Token
- Meta Pixel ID
- Meta Pixel Test ID
Figure 10: Meta conversion api server variables setup gtm stape
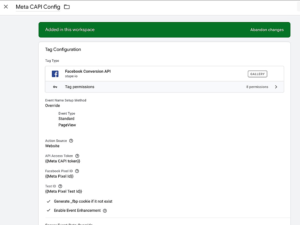
Step 11: Create Meta CAPI PageView Tag
- Template: Facebook Conversion API (by Stape)
- Pixel ID: {{Meta Pixel ID}}
- API Token: {{Meta CAPI Token}}
- Test Event Code: {{Meta Pixel Test ID}}
- Parameters: Event ID → Event Data, fbp → Event Data, fbc → Event Data
- Trigger: All Pages
- Save as: Meta CAPI Config
Figure 11: Meta conversion api pageview tag setup server container stape
Step 12: Create Meta CAPI Lead Tag
Duplicate the Config tag and modify:
- Event Name: Lead
- Parameters to Add: Email → Event Data, Phone → Event Data
- Trigger: generate_lead
- Save as: Meta CAPI Lead
Figure 12: Meta conversion api lead tag setup unbounce server tracking
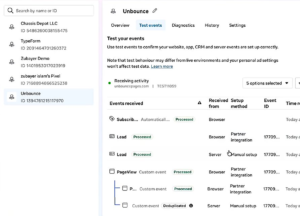
Testing & Deduplication Verification
- Open Preview Mode for both your Server container and Web container.
- Reload your Unbounce page → Confirm PageView fires on both Web and Server.
- Submit the form → Confirm Lead fires on both Web and Server.
- Go to Meta Test Events.
- Confirm both Browser & Server events appear.
- Crucial: Click into the event and confirm the Event ID is identical for both.
- Same Event ID = Proper deduplication
➡️ For advanced attribution, explore Meta Conversion API documentation
Figure 13: Meta event manager deduplication verification event id match browser server
Final Publish Step
Once everything is tested and verified, publish both your Web and Server GTM containers. This ensures that your Meta Pixel and Conversion API setup is fully live and collects accurate data.
✔ Publish Web GTM container
✔ Publish Server GTM container
✔ Confirm events are firing in Meta Events Manager
As a result, your Meta Pixel Conversion API Setup for Unbounce is now active, and conversions will start appearing accurately inside your Meta Ads reporting dashboard.
Comparison: Pixel Only vs Pixel + Conversion API (Unbounce Tracking)
| Feature | Pixel Only (Browser Tracking) | Pixel + Conversion API (Advanced Tracking) |
| Data Accuracy | ❌ Incomplete due to browser limitations | ✅ High accuracy with server-side data |
| Data Loss | ❌ High (ad blockers, iOS restrictions) | ✅ Low (server-side recovery) |
| Attribution Quality | ❌ Weak and inconsistent | ✅ Strong and reliable attribution |
| Deduplication | ❌ Not supported | ✅ Event ID based deduplication |
| Server-Side Tracking | ❌ Not available | ✅ Fully supported via GTM + Stape |
| Lead Matching (EMQ) | ❌ Limited matching | ✅ Improved match quality (email, phone) |
| Campaign Optimization | ❌ Weak signals for Meta Ads | ✅ Strong signals for better optimization |
| Tracking Stability | ❌ Breaks frequently | ✅ Stable across browsers & devices |
| Scalability | ❌ Limited | ✅ Scalable tracking infrastructure |
| ROI Impact | ❌ Lower performance visibility | ✅ Higher ROI with accurate data |
Tracking Overview
This setup combines browser tracking (Meta Pixel) and server-side tracking (Conversion API) using GTM and Stape to ensure complete data capture. As a result, it reduces tracking loss, improves attribution accuracy, and delivers reliable conversion reporting for Unbounce forms. In addition, Event ID ensures clean deduplication, preventing duplicate events and maintaining data consistency.
Real Use Case
A lead generation agency implemented this setup:
• Conversion tracking accuracy increased by 30–40%
• Cost per lead reduced significantly
• Better attribution across campaigns
• Improved scaling decisions
➡️ For similar setups, check Unbounce Google Ads Conversion Tracking Guide
Common Mistakes
Avoid these common errors to ensure accurate tracking:
• Missing Event ID — causes duplicate or mismatched events
• Incorrect triggers — tags fail to fire properly
• Missing FBP/FBC — weakens attribution accuracy
• Not sending email/phone — reduces match quality
• Skipping server setup — incomplete tracking
• Not testing in GTM & Meta Events Manager — errors go unnoticed
As a result, these issues lead to poor data quality and weak campaign performance.
Pro Tips
- Always use Event ID for deduplication
- Monitor events in Meta Event Manager
- Use server-side tracking for better accuracy
- Implement full funnel tracking for advanced attribution
Frequently Asked Question
How to set up the Meta Pixel Conversion API Setup for Unbounce?
Use Google Tag Manager to implement Meta Pixel browser tracking and Meta Conversion API server-side tracking via Stape. In the Web container, create Meta Pixel Config and Lead tags with Event ID, FBP and FBC variables. Then create Stape Data Tags to send the same events to your server container. In the server container create Meta CAPI tags using the Stape Facebook Conversion API template with matching Event ID for deduplication.
Why is Unbounce Facebook conversion tracking not working?
The most common causes are incorrect trigger setup in GTM, a missing or misconfigured form listener script, mismatched Event IDs between browser and server events, or an incorrect server container URL in the Stape Data Tag. Always test in GTM Preview Mode for both Web and Server containers simultaneously and verify events in Meta Events Manager Test Events tab before publishing.
Can I track Unbounce forms without a thank you page?
Yes. The form listener script in GTM detects form submissions directly on the Unbounce landing page and pushes a custom event into the GTM Data Layer without requiring a page redirect to a separate thank-you page. This ensures conversions are captured even when Unbounce confirmation dialogs are used instead of redirect pages.
How do I verify Meta Pixel and Conversion API events?
Open GTM Preview Mode for both your Web and Server containers simultaneously. Submit a test form on your Unbounce page and confirm the Lead event fires in both containers. Then go to Meta Events Manager and open the Test Events tab. Confirm that both the browser and server Lead events appear with identical Event IDs — matching Event IDs confirm deduplication is working correctly.
Do I need Stape for server-side tracking?
Stape is not mandatory but is strongly recommended for most businesses. It hosts your GTM server container on a custom domain, handles all server infrastructure automatically, and provides a simple monitoring dashboard. Without Stape, you would need to self-host a server container on Google Cloud Platform or another provider, which requires DevOps knowledge and ongoing server management.
Conclusion
Implementing Meta Pixel Conversion API Setup for Unbounce ensures accurate tracking, reliable attribution, and stronger Meta Ads performance. As a result, businesses can reduce data loss, improve optimization, and scale campaigns with confidence.
➡️ You can also explore Full Funnel Tracking System for Lead Generation
Ready to implement Unbounce tracking?
Start your setup today to capture accurate data and improve Meta Ads performance.
👉 WhatsApp: https://wa.me/8801735749155
👉 Book a Call: https://zcal.co/zubayerislam01/consultation
