
Introduction
Accurate Google Ads offline conversion tracking with HubSpot CRM is essential for businesses that generate leads online but close sales offline through calls, emails, demos, or sales teams. Standard browser-based tracking only records form fills or initial leads, which means Google Ads cannot see which leads actually became qualified opportunities or paying customers.
By implementing Google Ads offline conversion tracking with HubSpot CRM, businesses can send real sales outcomes back into Google Ads and optimize campaigns based on actual revenue instead of basic lead submissions.
➡️ Google Ads Offline Conversion Tracking helps advertisers import qualified lead and closed-deal data into Google Ads for smarter bidding and better ROI.
If you want a complete attribution ecosystem, explore Full Funnel Tracking for Google Ads using CRM, GTM & Stape.
This guide will show you how to connect HubSpot CRM with Google Ads, map lead stages correctly, and build a reliable offline conversion tracking system in 2026.
🎥 Watch Now
Figure: Google Ads Offline Conversion Tracking with HubSpot CRM Full Funnel Setup Tutorial
Struggling to track real revenue from your ads?
I help businesses implement Google Ads Offline Conversion Tracking with HubSpot CRM for accurate attribution and ROAS improvement.
👉 WhatsApp: https://wa.me/8801735749155
👉 Book a Call: https://zcal.co/zubayerislam01/consultation
What is Google Ads Offline Conversion Tracking with HubSpot CRM?
Google Ads Offline Conversion Tracking with HubSpot CRM is a system that sends lead lifecycle data (such as Sales Qualified Leads and Closed Deals) from HubSpot back to Google Ads, allowing campaigns to optimize based on actual revenue instead of form submissions.
Why is it Important?
It enables advertisers to:
- Track real sales instead of just leads
- Improve campaign optimization using revenue data
- Increase return on ad spend (ROAS)
Quick Answer
Google Ads offline conversion tracking with HubSpot connects your CRM data back to your ad campaigns. When a lead moves through HubSpot lifecycle stages — from form submission to Sales Qualified Lead to Closed Deal — those events are sent back to Google Ads as conversions. This allows Google to optimize your campaigns based on actual revenue, not just form fills
Key Takeaways
- Google Ads Offline Conversion Tracking connects CRM data with campaigns
- HubSpot lifecycle stages map directly to conversion events
- Enables tracking of qualified leads, sales, and revenue
- Improves ROAS using real business data
- Eliminates dependency on low-quality lead metrics
Tools Used in This Setup
- Google Ads – For conversion tracking and campaign optimization
- HubSpot CRM – For managing lead lifecycle stages and deal data
- Google Tag Manager (GTM) – For tracking form submissions and triggering conversion events
How the System Works (Simple Flow)
Ad Click → Website Form → HubSpot CRM → Lifecycle Stage Update → Google Ads Conversion → Revenue Attribution
Why It Matters
Without offline tracking:
- Only form submissions are tracked
- Campaign optimization becomes inaccurate
- Budget is wasted on unqualified leads
If you’re currently relying only on basic conversion tracking, it’s important to understand how to build a more advanced and future-proof system.
👉 Learn more: How to Make Future Proof Conversion Tracking in 2026 (Full Funnel System for Lead Generation)
With proper setup:
- Full funnel tracking becomes possible
- Campaigns optimize toward real conversions
- ROAS improves significantly
Prerequisites
- Website with contact form
- HubSpot CRM connected to website
- Google Ads account
- Lifecycle stages configured in HubSpot
- Google Tag Manager installed
Step-by-Step Implementation
Step 1: Capture Lead from Website Form
Open the website where the contact form is located.
When a user submits the form, the lead data is sent to HubSpot Contacts.
In Google Tag Manager:
- Go to Triggers → New
- Select Form Submission
- Enable “Wait for Tags” and “Check Validation”
This ensures accurate form tracking.
If you’re using landing page builders like Unbounce, you can also implement enhanced conversion tracking for higher accuracy.
👉 Check this guide: Unbounce Form Conversion Tracking for Google Ads (Enhanced Conversions) via GTM
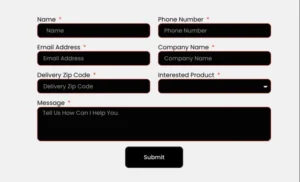
Figure 1: Website Contact Form Submission Interface
Step 2: Raw Lead Appears in HubSpot CRM
After form submission:
- Navigate to HubSpot → Contacts
- Verify new contact record
The lifecycle stage is set to Raw Lead by default.
You can configure lifecycle stages in:
Settings → Properties → Lifecycle Stage
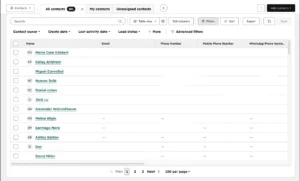
Figure 2: HubSpot CRM Showing Raw Lead Contact Record
Step 3: Send Raw Lead Conversion to Google Ads
Create a conversion action in Google Ads:
- Go to Tools → Conversions
- Click New Conversion Action
- Select Website → Lead
Then connect this conversion with GTM to fire on form submission.
Figure 3: Raw Lead Conversion Tracking Setup via GTM![]()
Step 4: Move Lead to Sales Qualified Stage
Inside HubSpot:
- Create a deal for the contact OR
- Use automation to update lifecycle stage
Automation path:
Workflows → Trigger → Deal Created → Set Lifecycle Stage = SQL
To improve automation and tracking accuracy across your CRM workflows, you can combine this setup with a complete funnel tracking system.
👉 Read: Full Funnel Tracking for Google Ads using CRM, GTM & Stape
Figure 4: HubSpot Workflow Automation for SQL Stage
Step 5: Track Final Sale Conversion
When a deal is closed:
• Lifecycle stage becomes Customer
This indicates a successful conversion
Figure 5: HubSpot Closed Deal (Customer Stage)
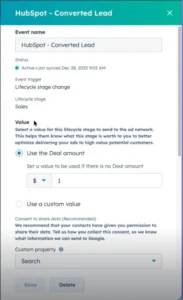
Step 6: Send Revenue Value to Google Ads
Send deal value using offline conversion import.
Required:
- GCLID
- Conversion name
- Conversion value
Upload via:
Google Ads → Tools → Conversions → Uploads
To avoid data loss caused by browser restrictions, it’s important to properly protect your tracking identifiers like GCLID.
👉 Read: Protect Your GCLID in Safari 26: Google Ads Server-Side Tracking with GTM & Stape
Figure6: Google Ads Offline Conversion Upload Interface
![]()
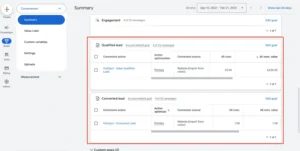
Step 7: Create Conversion Events in Google Ads
Create 3 conversion actions:
• Raw Lead
• Sales Qualified Lead
• Converted Lead
Use dynamic values for accurate reporting.
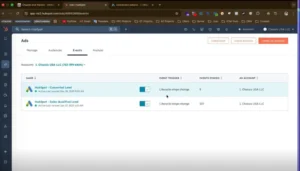
Figure 7: Google Ads Conversion Events Setup
Step 8: Match HubSpot Lifecycle with Google Ads
Raw Lead → Lead
Sales Qualified Lead → Qualified Lead
Customer → Converted Lead
This mapping ensures accurate tracking and attribution.
Figure 8: HubSpot to Google Ads Lifecycle Mapping
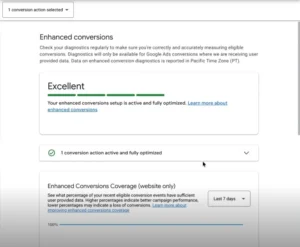
Step 9: Enable Enhanced Conversions
In Google Ads:
- Go to Tools → Conversions
- Select conversion
- Enable Enhanced Conversions
Include:
- Phone
- Address
This improves match rate and tracking accuracy.
Figure 9: Enhanced Conversions Settings in Google Ads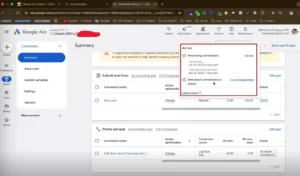
Step 10: Verify Conversion Data
Check conversion status inside Google Ads:
• Status = Recording
• Data Quality = Good or Excellent
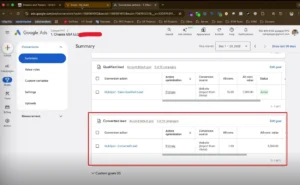
Figure 10: Google Ads Conversion Status Dashboard
Step 11: Test Offline Conversion Tracking
Submit a test lead and move it through lifecycle stages:
Lead → SQL → Customer
Verify each stage appears in Google Ads.
Step 12: Final Publish
Ensure all systems are connected and syncing properly.
✔ Google Ads Offline Conversion Tracking with HubSpot CRM is now active.
Comparison
| Feature | Basic Tracking | Offline Tracking |
| Tracks leads | Yes | Yes |
| Tracks sales | No | Yes |
| Tracks revenue | No | Yes |
| Optimizes ROAS | No | Yes |
Tracking Overview
| Stage | Tool Used | Data Sent to Google Ads |
| Form Submission | GTM | Raw Lead |
| SQL Stage | HubSpot | Qualified Lead |
| Closed Deal | HubSpot | Converted Lead + Revenue |
Real Use Case
Ad Click → Form → HubSpot → SQL → Deal → Revenue → Google Ads
Example:
- 100 leads
- 40 qualified
- 10 sales
- $15,000 revenue
Now Google Ads optimizes for real revenue instead of leads.
Common Mistakes
- Not capturing GCLID
- Incorrect lifecycle mapping
- Not enabling enhanced conversions
- Not testing the full funnel
- Delays in data upload
Pro Tips
- Use server-side tracking for better accuracy
For higher data accuracy and better attribution, you should implement server-side tracking alongside this setup.
👉 Learn more: Google Ads First Party Server-Side Tracking with GTM & Stape
- Combine with Conversion API
- Use value-based bidding (tROAS)
- Automate HubSpot workflows
Frequently Asked Question
Does HubSpot sync with Google Ads automatically?
Yes, but offline conversion tracking requires proper setup or manual import.
What is GCLID?
GCLID is a unique click ID used to match ad clicks with conversions.
Can I track revenue in Google Ads?
Yes, by sending deal values from HubSpot.
How long does it take to see conversions?
Typically 6–24 hours.
Is this setup required?
Yes, for accurate tracking and campaign optimization.
Conclusion
Tracking only form submissions is no longer enough.
With Google Ads Offline Conversion Tracking and HubSpot CRM integration, you can track the full customer journey and optimize campaigns based on real revenue.
Want to track real revenue instead of just leads?
I can help you set up a complete offline conversion tracking system.
👉 WhatsApp: https://wa.me/8801735749155
👉 Book a Call: https://zcal.co/zubayerislam01/consultation
