Introduction
Enhanced conversion tracking is essential for improving the accuracy of Google Ads conversion tracking. For Shopify stores, setting up Enhanced Conversions ensures that Google Ads receives first-party customer data, improving attribution and reporting accuracy. In this guide, I’ll walk you through setting up Google Ads Enhanced Conversion tracking for Purchase conversions using Google Tag Manager (GTM).
Benefits of Enhanced Conversions
- Better Conversion Tracking: Helps capture more accurate conversion data, even when cookies are limited.
- Improved Attribution: Enhances data accuracy, allowing Google Ads to attribute conversions to the right campaigns.
- Privacy-Safe Data Collection: Uses SHA256 hashing to securely transmit customer information.
- Higher Campaign Performance: Leads to better optimization and improved return on investment (ROI).
Prerequisites
Before proceeding, ensure you have:
- A Shopify store with a data layer that includes Purchase event details.
- Google Tag Manager installed on your Shopify store.
- Google Ads account with access to Conversion Tracking.
💡 Need help setting up your data layer or conversion tracking?
✅ Hire Me for Setup: WhatsApp Me
✅ Book a Consultation: Schedule a Call
Step-by-Step Guide to Setting Up Enhanced Conversions in Shopify
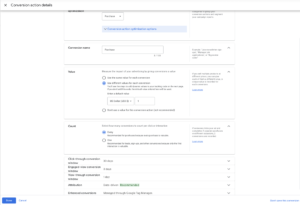
Step 1: Create a New Conversion Action in Google Ads
- Log in to your Google Ads account.
- Navigate to Tools and Settings > Measurement > Conversions.
- Click New Conversion Action.
- Select Website as the conversion source.
- Enter your Shopify store’s URL and click Scan.
- Choose Purchase as the conversion action.
- Set up the conversion details:
- Category: Purchase
- Value: Use different values for each conversion (recommended for eCommerce)
- Count: Every
- Enable Enhanced Conversions.
- Click Done, then Save and Continue.
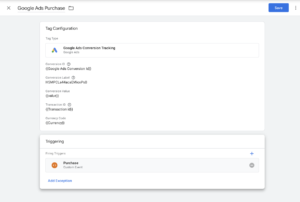
Step 2: Set Up Google Ads Conversion Tag in GTM
- Open Google Tag Manager and navigate to Tags.
- Click New and select Google Ads Conversion Tracking.
- Enter the Conversion ID and Conversion Label from Google Ads.
- Set Transaction Value dynamically:
- Click + next to Conversion Value.
- Select or create a variable for transaction value from the data layer.
- Similarly, set the Currency Code.
- Enable Enhanced Conversions and select Data Layer as the method.
- Click Triggering, select Custom Event, and enter
purchaseas the event name. - Save the tag.
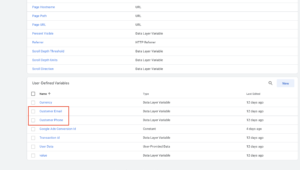
Step 3: Create Custom Variables for Enhanced Conversion Data
- Navigate to Variables in GTM.
- Click New and select Data Layer Variable.
- Create variables for:
customer_email:ecommerce.purchase.customer.emailcustomer_phone:ecommerce.purchase.customer.phone
- Save each variable.
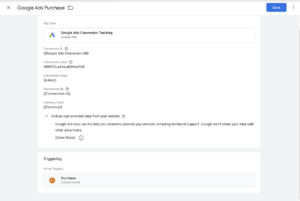
Step 4: Modify Google Ads Conversion Tag to Include Customer Data
- Edit the Google Ads Conversion Tag in GTM.
- Scroll down to Enhanced Conversions.
- Select Manually specify customer data.
- Map the variables created in Step 3:
- Email →
customer_email - Phone →
customer_phone
- Email →
- Save the tag.
Step 5: Test the Setup
- Click Preview in GTM and enter your Shopify store URL.
- Perform a test purchase.
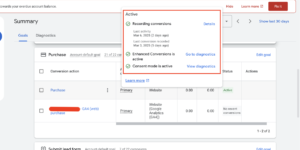
- In Tag Assistant, check if the Google Ads Conversion Tag fires with the correct data.
- In Google Ads, go to Conversions > Enhanced Conversions and check for pending data.
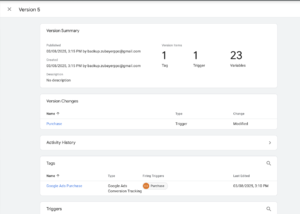
Step 6: Publish the GTM Container
- If everything works correctly, click Submit in GTM.
- Add a version name and description.
- Click Publish.
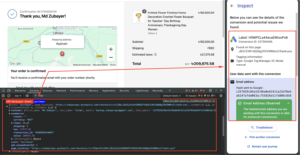
Proof of Successful Setup
Here’s a real example of a successful Enhanced Conversion tracking setup that I implemented. You can see the active tracking status in Google Ads, confirming that Enhanced Conversions are working correctly.
Conclusion
By following these steps, you’ve successfully set up Google Ads Enhanced Conversion tracking for your Shopify store’s purchase events. This setup ensures Google receives accurate first-party data, improving ad attribution and performance. If you face any issues, double-check your data layer setup and GTM configuration.
As a Conversion Tracking Expert, I have helped many businesses implement accurate tracking setups, ensuring they get the best results from their advertising campaigns.
🚀 Need Help Setting Up Enhanced Conversions?
If you need the customer pixel script, help with setup, or face any issues, I can assist you.
✅ Hire Me for Setup: WhatsApp Me
✅ Book a Consultation: Schedule a Call
For more insightful guides and tips on conversion tracking and digital marketing, check out my other Blogs Here:
