
Quick Answer
WooCommerce Google Ads conversion tracking with GTM means sending every completed WooCommerce purchase — including dynamic order value, transaction ID, and currency — into Google Ads as a purchase conversion event using a Google Ads Conversion tag inside Google Tag Manager. Specifically, you create a purchase conversion goal in Google Ads, copy the Conversion ID and Conversion Label, then configure a Google Ads Conversion Linker tag and a Google Ads Conversion tag in GTM to fire on the same purchase Custom Event trigger already used by your GA4 purchase tag — reusing the same Data Layer variables for value, transaction ID, and currency. As a result, Google Ads receives accurate purchase revenue data on every completed order, enabling Smart Bidding to optimize toward real buyers, improving ROAS measurement, and unlocking Enhanced Conversions through hashed customer data.
Key Takeaways
✅ Before setting up the Google Ads Conversion tag, install the Conversion Linker first.
Without the Conversion Linker, Google Ads cannot read the GCLID from the URL and match clicks to conversions — which means your purchase conversions will not be attributed to the correct ad clicks.
✅ The Google Ads Conversion tag reuses the same Data Layer variables from your GA4 purchase tag.
Specifically, dlv_ecommerce_value, dlv_transaction_id, and dlv_ecommerce_currency — you do not need to create new variables, only a new tag with the same Custom Event trigger set to fire on the “purchase” event.
✅ Dynamic conversion value is critical for Google Ads Smart Bidding to function accurately.
Passing the actual WooCommerce order total — not a fixed value — allows Target ROAS bidding to optimize toward higher-revenue orders, producing far better campaign efficiency than fixed-value conversion tracking.
✅ Enhanced Conversions must be enabled in the Google Ads Conversion tag in GTM.
Select the user data variable the GTM4WP plugin already pushes to the Data Layer — because Enhanced Conversions uses hashed customer email and phone to match conversions from iOS users and ad blocker users who would otherwise be invisible to browser-side tracking.
Introduction
Your WooCommerce store is generating orders. However, if your Google Ads campaigns cannot see those purchases — with their actual revenue values — every bidding decision Google makes is based on guesswork instead of real data.
Most store owners install GA4 purchase tracking first and assume Google Ads will figure out the rest. It does not. Google Ads requires its own dedicated conversion tag to receive purchase signals, and without dynamic value passing, Smart Bidding cannot distinguish a $30 order from a $300 order. As a result, Target ROAS bidding has nothing meaningful to optimise toward.
As a Stape Certified Partner, and Marketing Attribution Specialist, I have built this exact tracking setup for WooCommerce stores running Google Ads across multiple industries. Therefore, this guide covers the complete WooCommerce Google Ads conversion tracking setup — Conversion Linker, Conversion tag, dynamic value, Enhanced Conversions, and GTM Preview Mode verification — so your Google Ads campaigns finally receive the purchase revenue data they need to scale.
🎥 Watch Now
Figure 1: WooCommerce Conversion Tracking with GTM for Google Ads — Complete Setup Guide
What Is WooCommerce Google Ads Conversion Tracking with GTM?
WooCommerce Google Ads conversion tracking with GTM is the process of sending every completed WooCommerce purchase — with its dynamic order value, transaction ID, and currency — into Google Ads as a purchase conversion event, using Google Tag Manager to deploy the tracking tags without touching your site code.
Specifically, this setup uses three components working together: a Google Ads Conversion Linker tag that captures the GCLID from ad clicks, a Google Ads Conversion tag that fires on completed purchases and sends revenue data to Google Ads, and your existing WooCommerce ecommerce Data Layer that supplies the order value, transaction ID, and currency the conversion tag needs. As a result, Google Ads knows which ad clicks led to purchases and how much revenue each purchase generated.
For reference on how Google Ads conversion tracking works at the API level, see the Google Ads conversion tracking overview from Google’s official developer documentation.
Why Google Ads Conversion Tracking Matters for WooCommerce
Running Google Ads without purchase conversion tracking means your campaigns are spending budget without knowing which clicks turn into paying customers. However, the problem goes deeper than simply missing purchase counts.
Without proper Google Ads conversion tracking, these problems occur:
- Smart Bidding has no purchase signal — consequently, it optimises toward clicks and page views instead of revenue-generating customers
- Target ROAS bidding cannot function because Google Ads has no order value data to measure return against
- Google Ads may report zero conversions while your WooCommerce store processes real orders every day
- Duplicate conversions inflate your count when using page view triggers instead of Custom Event triggers
- Budget allocation across campaigns, ad groups, and keywords is based on impression and click data — not actual sales
On the other hand, with proper WooCommerce Google Ads conversion tracking in place:
- Every completed WooCommerce order sends a purchase conversion with the exact order value to Google Ads
- Target ROAS bidding receives real revenue signals — therefore, Smart Bidding genuinely optimises toward higher-value customers
- Enhanced Conversions recovers attribution from iOS users and ad blocker users, typically adding 15–25% more tracked conversions
- Transaction IDs prevent duplicate conversions — each order is counted exactly once regardless of page refreshes
- Google Ads campaign performance reports show accurate ROAS per campaign, ad group, and keyword
How the System Works — Complete Data Flow
Before building the setup, it is important to understand exactly how the purchase data flows from your WooCommerce store into Google Ads. In other words, this is a four-step attribution chain from ad click to purchase revenue.
Figure 2: Complete Data Flow — WooCommerce Purchase Through GTM Conversion Linker and Google Ads Conversion Tag.
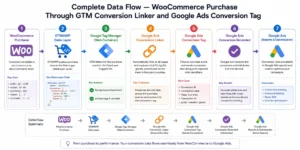
- Step 1 — First, a customer clicks your Google Ad. The Conversion Linker tag — which fires on All Pages — captures the GCLID (Google Click Identifier) from the URL and stores it in a first-party cookie on your domain.
- Step 2 — Next, the customer browses your WooCommerce store and completes a purchase. The GTM4WP plugin pushes a structured “purchase” event to the Data Layer containing the order value, transaction ID, currency, and product items array.
- Step 3 — Subsequently, Google Tag Manager detects the “purchase” Data Layer event and fires the Google Ads Conversion tag. The tag reads the conversion value, transaction ID, and currency from the Data Layer variables and sends a purchase conversion to Google Ads — along with the stored GCLID to match the conversion back to the original ad click.
- Step 4 — Finally, Google Ads receives the purchase conversion with the exact order revenue. Smart Bidding uses this signal to adjust bids toward customer profiles that are more likely to purchase at higher values.
Prerequisites
Before starting this setup, make sure the following are already in place:
- WooCommerce GA4 purchase tracking already working in GTM — the Data Layer variables (dlv_ecommerce_value, dlv_transaction_id, dlv_ecommerce_currency) and the CE — WooCommerce Purchase Custom Event trigger must already exist
- Google Tag Manager container installed on your WooCommerce store
- Google Ads account with admin access to create conversion goals
- Google Ads account linked to your GTM container (via Admin → Linked accounts in Google Ads)
- GTM Preview Mode access for testing
- A test product available for a real purchase during validation
- Stape.io account if planning to add server-side tracking to improve conversion coverage
IMPORTANT: This guide assumes your WooCommerce GA4 purchase tracking is already set up and validated. Therefore, if you have not yet set up the GTM4WP plugin with the WooCommerce Data Layer and the GA4 purchase tag, complete that setup first before continuing. The Google Ads Conversion tag reuses the same variables and trigger.
Step-by-Step Implementation
Step 1: Create a Purchase Conversion Goal in Google Ads
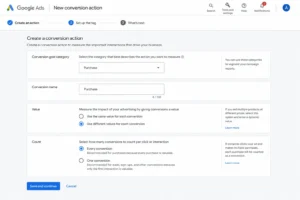
To begin, go to your Google Ads account → Goals → Conversions → Summary → New Conversion Action.
Select Website as the conversion source. Enter your WooCommerce store URL and click Scan. After scanning, select Purchase as the conversion category. Set the conversion name to Purchase. Under Value, select Use different values for each conversion — this enables dynamic value passing from your WooCommerce Data Layer.
Under Count, select Every conversion — because for ecommerce purchases you want to count every individual transaction, not just one per customer. Click Done then Save and Continue.
CRITICAL: Do NOT select “Use the same value for each conversion” (fixed value). Specifically, a fixed value defeats the entire purpose of dynamic tracking — because Google Ads Smart Bidding will receive the same revenue number for every order regardless of actual order size, making Target ROAS bidding completely unreliable.
Figure 3: Google Ads New Conversion Goal — Purchase Selected with Dynamic Value and Every Conversion Count.
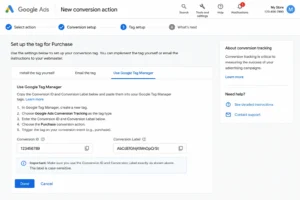
Step 2: Copy the Conversion ID and Conversion Label
After saving the conversion goal, Google Ads presents three implementation options. Select Use Google Tag Manager. Google Ads then displays your Conversion ID and Conversion Label — two values you need to configure the conversion tag in GTM.
Copy both values and keep them ready. The Conversion ID is a numeric string (e.g. 123456789). The Conversion Label is an alphanumeric string (e.g. AbCdEfGhIj). Both are unique to this specific conversion action.
IMPORTANT: The Conversion ID and Label are different for every conversion action. Therefore, copy them directly from this screen — do not type from memory or use values from a different conversion goal.
Figure 4: Google Ads Conversion ID and Label — Google Tag Manager Implementation Screen.
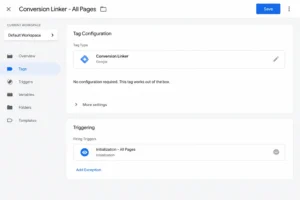
Step 3: Create the Google Ads Conversion Linker Tag in GTM
In Google Tag Manager, go to Tags → New. Select Conversion Linker as the tag type.
The default Conversion Linker settings are correct for most setups — leave them unchanged. Set the trigger to All Pages (Initialization — All Pages trigger). Name the tag Google Ads Conversion Linker and save.
CRITICAL: The Conversion Linker tag must fire on All Pages — not just the thank you page. Specifically, it needs to capture the GCLID the moment a customer lands on your site from an ad click — which happens on the landing page, not the confirmation page. Without this, Google Ads cannot match the purchase conversion back to the ad click that drove it.
Figure 5: Google Tag Manager Conversion Linker Tag — Tag Type and All Pages Trigger Configuratio.
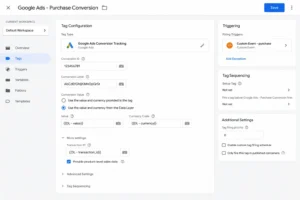
Step 4: Create the Google Ads Conversion Tag in GTM
In GTM, go to Tags → New. Select Google Ads Conversion Tracking as the tag type.
Configure the following fields:
| Field | Value |
| Conversion ID | Paste the Conversion ID copied from Google Ads (Step 2) |
| Conversion Label | Paste the Conversion Label copied from Google Ads (Step 2) |
| Conversion Value | Select variable: {{dlv_ecommerce_value}} |
| Transaction ID | Select variable: {{dlv_transaction_id}} |
| Currency Code | Select variable: {{dlv_ecommerce_currency}} |
These are the same Data Layer variables already created for your GA4 purchase tag. Therefore, you do not need to create new variables — simply select the existing ones from the variable dropdown.
Figure 6: Google Ads Conversion Tag in GTM — Conversion ID, Label, Dynamic Value, Transaction ID, Currency Configuration.
Step 5: Enable Enhanced Conversions
Still in the Google Ads Conversion tag, scroll down to the Enhanced Conversions section. Enable Include user-provided data from your website and select your user data variable from the dropdown.
The GTM4WP plugin already pushes hashed customer email and phone to the Data Layer when Customer Data is enabled in the WooCommerce integration settings. As a result, this variable already contains the hashed data Google Ads needs for Enhanced Conversions matching.
Enhanced Conversions uses hashed first-party customer data to match conversions back to logged-in Google users — consequently recovering 15–25% of purchase conversions that browser-side tracking misses due to iOS privacy restrictions and ad blockers. For technical details on how Enhanced Conversions works, refer to the Enhanced Conversions for Web documentation from Google Ads support.
IMPORTANT: Enhanced Conversions requires that Customer Data be enabled in the GTM4WP plugin settings (Integrations → WooCommerce → Customer data in Data Layer → ON). Additionally, it must be enabled in your Google Ads account under Goals → Conversions → Settings → Enhanced Conversions before GTM can send the data successfully.
Step 6: Assign the Purchase Custom Event Trigger
Set the trigger for the Google Ads Conversion tag to the same CE — WooCommerce Purchase Custom Event trigger already used by your GA4 purchase tag. This trigger fires when the “purchase” event is pushed to the Data Layer on the order confirmation page.
Name the tag Google Ads — WooCommerce Purchase and save.
CRITICAL: Use the CE — WooCommerce Purchase Custom Event trigger — NOT a Page View trigger on the thank you page URL. Specifically, a Page View trigger fires on every page load including refreshes and email link clicks — consequently inflating your Google Ads conversion count with duplicate events. In contrast, the Custom Event trigger fires exactly once per Data Layer push per completed order.
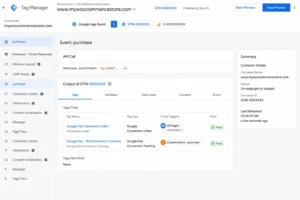
Step 7: Test in GTM Preview Mode
Go to GTM → Workspace → Preview. Enter your WooCommerce store URL and connect. Complete a full real test purchase from product page through checkout to the order confirmation page.
On the thank you page, confirm in GTM Preview:
- The “purchase” Custom Event appears in the event list
- Google Ads Conversion Linker tag shows as Fired (on all earlier pages)
- Google Ads — WooCommerce Purchase tag shows as Fired
- Conversion value matches your test order total
- Transaction ID matches your WooCommerce order number
- Currency shows your store currency code (e.g. USD, BDT)
CHECK: In GTM Preview, click the Google Ads Conversion tag and expand the Output tab. Specifically, confirm the conversion_value, transaction_id, and currency_code fields are all populated with correct values — not undefined. Additionally, confirm the Enhanced Conversions section shows hashed email data if customer data is enabled.
Figure 7: GTM Preview Mode — Google Ads Conversion Linker and Purchase Tag Both Fired on WooCommerce Thank You Page .
Step 8: Publish the GTM Container
Once all tags fire correctly in GTM Preview Mode with correct values, go to GTM → Submit. Name the version Google Ads WooCommerce Purchase Conversion Setup. Click Publish.
After publishing, complete one final live test purchase and verify in your Google Ads account under Goals → Conversions → Summary. The conversion should appear within a few hours — though it may take up to 24 hours for the first conversion to show in the Google Ads dashboard.
Without vs With Google Ads Conversion Tracking — Comparison
| Feature | Without Conversion Tracking | With GTM Conversion Setup |
| Purchase data in Google Ads | ❌ No purchase signal | ✅ Every order tracked with revenue |
| Dynamic order value | ❌ No value — fixed or empty | ✅ Actual WooCommerce order total |
| Transaction ID | ❌ Missing — duplicates common | ✅ Unique ID prevents duplicates |
| Smart Bidding signal | ❌ Click-based only | ✅ Purchase revenue-based |
| Target ROAS bidding | ❌ Cannot function accurately | ✅ Fully enabled with real revenue |
| Enhanced Conversions | ❌ Not available | ✅ Hashed email/phone matching |
| iOS + ad blocker recovery | ❌ Conversions lost | ✅ 15–25% recovered via Enhanced Conv |
| ROAS measurable | ❌ Impossible | ✅ Per campaign, ad group, keyword |
| Bid adjustment accuracy | ❌ Guesswork | ✅ Data-driven by actual purchase value |
| Attribution to ad click | ❌ No GCLID matching | ✅ Conversion Linker captures GCLID |
Real Use Case — WooCommerce Store Running Google Shopping Campaigns
To illustrate the impact of proper tracking, consider this example. A WooCommerce electronics store had been running Google Shopping campaigns for 4 months with a fixed conversion value of $50 per order — because the owner did not know how to pass dynamic values. Although the campaigns were generating orders, Google Ads Smart Bidding was optimising toward any purchase regardless of order size, treating a $25 order the same as a $400 order.
Before proper Google Ads conversion tracking setup:
- Google Ads showing fixed $50 value for all purchases — actual average order value was $148
- Smart Bidding optimising toward low-value orders because they converted faster
- Target ROAS set at 200% based on false $50 value — actual ROAS was unmeasurable
- No Enhanced Conversions — consequently, 22% of purchases from iOS users went unattributed
- Duplicate conversions from page view trigger inflating count by an estimated 35%
After implementing proper WooCommerce Google Ads conversion tracking — 60 days:
- Dynamic value tracking revealed average order value of $148 — 3x higher than the fixed $50 used before
- Google Ads Smart Bidding shifted toward higher-value customer profiles within 30 days
- Enhanced Conversions recovered 18% of previously untracked iOS conversions
- Duplicate conversion count corrected — true purchase count was 31% lower than inflated numbers
- Target ROAS bidding achieved 8x ROAS within 60 days of accurate dynamic value tracking
Tools Used
| Tool | Purpose |
| Google Ads | Create purchase conversion goal — generate Conversion ID and Label |
| Google Tag Manager | Deploy Conversion Linker + Google Ads Conversion tag without code changes |
| GTM4WP Plugin | WooCommerce Data Layer — pushes purchase event, value, transaction ID, customer data |
| WooCommerce | Ecommerce platform — order processing, thank you page where purchase event fires |
| Google Ads Conversion Linker | Captures GCLID from ad clicks to match purchases back to ad click attribution |
| GTM Preview Mode | Validates all tags fire correctly before publishing to production |
| Stape.io | GTM server container hosting for future server-side conversion tracking |
Common Mistakes
Mistake 1 — Skipping the Conversion Linker Tag
The Google Ads Conversion Linker is not optional — it is a prerequisite for the Google Ads Conversion tag to work correctly. Without it, the GCLID from the customer’s ad click is not captured and stored in a first-party cookie, which means Google Ads cannot match the purchase conversion back to the original ad click. As a result, your conversion may fire and appear in GTM Preview, but it will not attribute correctly to the campaign, ad group, or keyword that drove the purchase. The Linker must fire on All Pages — not just the thank you page.
Mistake 2 — Using a Fixed Conversion Value Instead of Dynamic Value
Setting a fixed conversion value (e.g. $50) in the Google Ads conversion goal instead of using the {{dlv_ecommerce_value}} Data Layer variable means Smart Bidding receives the same revenue signal for every order regardless of actual purchase size. Consequently, Target ROAS bidding cannot function accurately — it will optimize toward orders that convert quickly rather than orders that generate the most revenue. Always select “Use different values for each conversion” in the Google Ads conversion goal and always pass the Data Layer variable as the conversion value in GTM.
Mistake 3 — Using the Wrong Trigger on the Conversion Tag
Triggering the Google Ads Conversion tag on “Page URL contains /order-received” fires on every page load of the thank you page — including when customers refresh the page, bookmark it, or click the link from their order confirmation email. As a result, one real purchase generates multiple duplicate conversion events in Google Ads, inflating your conversion count and corrupting your ROAS data. Therefore, always use the CE — WooCommerce Purchase Custom Event trigger, which fires exactly once per purchase event pushed to the Data Layer.
Mistake 4 — Not Verifying Conversion ID and Label Match
Copying the Conversion ID and Label from the wrong conversion action in Google Ads is a silent error — the tag fires correctly in GTM Preview, but the conversion data is sent to a different or incorrect goal in Google Ads. Specifically, this happens when the advertiser has multiple conversion actions and copies values from the wrong row. Therefore, always verify the Conversion ID and Label match the “Purchase” conversion goal you created by checking them against the Google Ads Goals → Conversions → Summary screen after publishing.
Advanced Optimization Strategies
Tips 1: Pass Shipping and Tax to Align Google Ads Revenue with WooCommerce Totals
The dlv_ecommerce_value variable typically contains the subtotal — not the full order total including shipping and tax. To align your Google Ads revenue reporting with actual WooCommerce order totals, create additional Data Layer variables for ecommerce.shipping and ecommerce.tax and consider whether your conversion value should include or exclude these amounts consistently. Consistent value reporting across GA4 and Google Ads enables accurate cross-platform ROAS comparison.
Tips 2: Enable Target ROAS Bidding After 30+ Conversions Are Recorded
Google Ads recommends collecting at least 30–50 conversions within a 30-day period before switching to Target ROAS bidding — because Smart Bidding needs sufficient conversion history to model customer behaviour accurately. Therefore, run Maximize Conversion Value bidding for the first 30 days of accurate dynamic value tracking, then switch to Target ROAS once you have enough data. Starting with a Target ROAS close to your measured ROAS (e.g. 400% if your actual ROAS is 450%) gives Smart Bidding the tightest constraint to work within.
Tips 3: Use Transaction ID to Audit Duplicate Conversions in Google Ads
After publishing your Google Ads Conversion tag, export your conversions from Google Ads and check for duplicate transaction IDs — which indicate the deduplication is not working correctly. Specifically, navigate to Goals → Conversions → Summary, export a date range of conversions, and filter for repeated transaction ID values. If duplicates exist, the Custom Event trigger is not firing correctly — revisit the trigger configuration and ensure it is set to the “purchase” Custom Event name, not a page view trigger.
Tips 4: Import GA4 Conversions into Google Ads as a Backup Signal
Once both GA4 purchase tracking and Google Ads Conversion tag are running, link your GA4 property to Google Ads and import the GA4 purchase event as a secondary conversion. This provides a backup attribution signal — specifically useful for comparing Google Ads-attributed conversions against GA4-attributed conversions to identify attribution discrepancies. However, use the Google Ads Conversion tag as your primary bidding signal — because it fires client-side with the GCLID match, which is more accurate for Smart Bidding than imported GA4 conversions.
Tips 5: Add Server-Side Conversion Tracking via Stape for Maximum Coverage
Browser-side Google Ads conversion tags are blocked by iOS privacy restrictions and ad blockers — consequently losing 15–30% of purchase conversions depending on your audience. To recover these, set up a Stape.io GTM server container that receives the purchase event from your browser container and forwards the Google Ads conversion directly from the server — bypassing all browser-level blocking. The clean Data Layer setup in this guide is the exact foundation Stape server-side tracking requires, so no rework is needed when you are ready to add the server layer.
Frequently Asked Questions
Do I need to set up GA4 purchase tracking before Google Ads conversion tracking?
Yes — this guide assumes you have already set up the GTM4WP plugin with the WooCommerce ecommerce Data Layer and validated the GA4 purchase tag. Specifically, the Google Ads Conversion tag reuses the same Data Layer variables (dlv_ecommerce_value, dlv_transaction_id, dlv_ecommerce_currency) and the same CE — WooCommerce Purchase Custom Event trigger that the GA4 purchase tag uses. Therefore, completing the GA4 setup first gives you everything the Google Ads tag needs — you only add the Conversion Linker and Conversion tags on top.
What is a Conversion Linker tag and why is it required?
The Google Ads Conversion Linker is a GTM tag that captures the GCLID (Google Click Identifier) — a unique parameter Google Ads appends to your URL when someone clicks your ad. The Linker stores this GCLID in a first-party cookie on your domain. Subsequently, when the customer completes a purchase, the Google Ads Conversion tag reads the stored GCLID and sends it with the conversion data, allowing Google Ads to match the purchase back to the specific ad click. Without the Conversion Linker, Google Ads cannot attribute conversions to the correct campaigns, and your Smart Bidding data becomes unreliable.
Why should I use dynamic conversion value instead of a fixed value?
A fixed conversion value tells Google Ads that every purchase is worth the same amount — for example, $50 — regardless of whether the actual order was $20 or $500. As a result, Smart Bidding optimises toward any purchase equally, which often means it prioritises lower-value orders that convert more frequently over higher-value orders that generate more revenue. In contrast, dynamic conversion value passes the actual WooCommerce order total with every conversion, enabling Target ROAS bidding to genuinely optimize toward higher-revenue customers and produce measurable return on ad spend.
How do I verify my Google Ads conversion tag is working correctly?
First, test in GTM Preview Mode by completing a real purchase and confirming the Google Ads Conversion Linker tag fired on all pages and the Google Ads Conversion tag fired on the thank you page with correct value, transaction ID, and currency. Then, in Google Ads, go to Goals → Conversions → Summary and check for your Purchase conversion action — it may take a few hours to 24 hours for the first recorded conversion to appear. Additionally, you can use Google Tag Assistant to verify the conversion tag is firing on live production purchases.
What is Enhanced Conversions and should I enable it?
Enhanced Conversions is a Google Ads feature that improves conversion measurement accuracy by sending hashed first-party customer data — specifically, SHA-256 hashed email address and phone number — alongside your standard conversion data. Google Ads uses this hashed data to match conversions back to logged-in Google users who clicked your ad, even if the browser cookie was blocked or deleted. For WooCommerce stores, the GTM4WP plugin pushes hashed customer email and phone from the completed order — so you can enable Enhanced Conversions by simply selecting the user data variable in your Google Ads Conversion tag. The typical result is a 15–25% increase in attributed conversions.
Should I use server-side tracking for Google Ads conversions in WooCommerce?
Browser-side Google Ads conversion tags are sufficient for most WooCommerce stores starting out, but they are vulnerable to iOS privacy restrictions and ad blockers — which can silently block 15–30% of conversion events. Server-side tracking routes your Google Ads conversion events from a server container hosted on Stape.io rather than the user’s browser, bypassing all client-side blocking. Furthermore, the browser-side Data Layer setup completed in this guide is the exact foundation server-side tracking requires — so migrating to Stape server-side conversion tracking requires no rework of your Data Layer or triggers.
Conclusion
In summary, WooCommerce Google Ads conversion tracking with GTM gives your campaigns the revenue data they need to move from click optimization to genuine purchase optimization. Because the Google Ads Conversion Linker captures GCLID, the Conversion tag passes dynamic order value with every purchase, and Enhanced Conversions recovers attribution from privacy-restricted browsers, your Smart Bidding finally has the signals it needs to find high-value customers.
As a result, Target ROAS bidding becomes meaningful, budget allocation improves across campaigns and ad groups, and every WooCommerce order contributes to building Google’s model of what your best customers look like. Ultimately, accurate Google Ads conversion tracking is what separates stores that scale profitably from those that spend without knowing what works.
Related Posts
- WooCommerce Conversion Tracking with GTM & GA4 (Complete Setup Guide 2026)
- Google Ads Server-Side Tracking with GTM & Stape (Complete Setup Guide 2026)
- Full Funnel Tracking for Google Ads with CRM, GTM & Stape (2026)
Ready to Fix Your Google Ads Conversion Tracking?
If your WooCommerce store is running Google Ads without accurate purchase conversion data — every bidding decision, budget allocation, and ROAS calculation is built on incomplete information. As a result, you are likely overpaying for lower-value customers while underbidding for your best buyers.
👉 Book a free consultation
👉 WhatsApp me directly
