
Introduction
Accurate Google consent mode v2 setup is essential for websites that use GA4 and Google Ads tracking. However, many businesses still rely on outdated consent implementations or expensive CMP tools, which creates compliance risks and incomplete tracking data. As a result, attribution becomes unreliable, and advertising performance can decline. Therefore, implementing a proper consent mode setup is critical for privacy compliance and accurate data collection.
As a Stape Certified Partner, I specialize in building advanced tracking systems using GTM, server-side tracking, and consent-based data collection. Therefore, this ensures accurate data flow, better attribution, and reliable performance across the full funnel.
In this guide, you’ll learn how to implement google consent mode v2 setup without paid cmp using GTM and a fully custom banner solution. As a result, you can manage consent signals properly, improve compliance, and maintain accurate GA4 and Google Ads tracking. For advanced setups, explore How to Make Future Proof Conversion Tracking in 2026 (Full Funnel System for Lead Generation) and Full Funnel Tracking for Google Ads using CRM, GTM & Stape.
🎥 Watch Now
Figure 1: Consent Mode V2 Tracking Flow (Banner → GTM → GA4 → Google Ads)
Struggling to implement Google Consent Mode V2 correctly?
Improper consent configuration can break tracking accuracy, attribution, and compliance signals for GA4 and Google Ads.
👉 WhatsApp: https://wa.me/8801735749155
👉 Book a Call: https://zcal.co/zubayerislam01/consultation
What Is Google Consent Mode V2 Setup?
Google consent mode v2 setup refers to configuring consent signals for GA4 and Google Ads using GTM and consent states like ad_storage and analytics_storage. These consent signals help Google products adjust tracking behavior based on user choices.
As a result, websites can remain privacy compliant while still collecting valuable measurement data. Therefore, businesses can maintain accurate attribution and campaign optimization without relying on a paid CMP platform.
Why Is It Important?
Without proper google consent mode v2 implementation, websites may fail to comply with privacy requirements and lose valuable tracking data. However, incorrect consent handling can also impact audience signals, conversion modeling, and campaign optimization. Therefore, implementing Consent Mode V2 correctly is critical for maintaining both compliance and tracking accuracy.
- Better GA4 and Google Ads compliance
- Improved tracking reliability
- More accurate attribution modeling
- Privacy-focused data collection
➡️ Learn more: Google Ads First Party Server-Side Tracking with GTM & Stape.
Quick Answer
Google consent mode v2 setup is implemented using GTM to manage consent signals like ad_storage and analytics_storage based on user choices. Then, consent mode dynamically adjusts how GA4 and Google Ads tags behave. As a result, websites can remain compliant while preserving accurate tracking and attribution.
Key Takeaways
- Google Consent Mode V2 helps websites manage consent signals for GA4 and Google Ads
- Using GTM allows flexible and scalable consent management without a paid CMP
- Consent states such as ad_storage and analytics_storage control tracking behavior
- Proper implementation improves privacy compliance and attribution accuracy
- Consent Initialization triggers ensure consent is set before other tags fire
- localStorage can be used to store user consent preferences dynamically
- Testing with GTM Preview and Tag Assistant is essential before publishing
- Consent Debug Mode helps validate consent signal behavior
- Proper setup improves conversion modeling and campaign optimization
- Free CMP implementations can still provide accurate and compliant tracking
Tools Used
- Google Tag Manager
- GA4
- Google Ads
- Google Tag Assistant
- localStorage
- stape.io
➡️ Google Consent Mode V2 setup guide.
How the System Works
First, a visitor lands on your website and sees the consent banner. Then, the user selects a consent option such as Allow All, Deny All, or Save Preferences. Next, GTM stores these preferences using localStorage and updates consent states dynamically. Meanwhile, GA4 and Google Ads tags adjust their behavior based on the consent signals received. Finally, tracking data is collected according to the user’s consent choices.
Why It Matters
If google consent mode v2 setup is not configured correctly, GA4 and Google Ads may lose important tracking signals. As a result, attribution becomes less accurate and campaign optimization weakens. However, with proper consent handling, businesses can maintain privacy compliance while preserving valuable measurement data.
Prerequisites
✔ Google Tag Manager installed
✔ GA4 configured
✔ Google Ads account
✔ Access to GTM container
✔ Consent banner JavaScript code
Step-by-Step Implementation
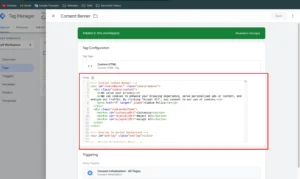
Step 1: Create a Custom HTML Tag to Show Banner & Store Data
- In GTM, create a Custom HTML tag.
- Paste your JavaScript code that:
Displays the consent banner with options (Allow All, Deny All, Save Preferences).
Saves the user’s consent choices (like ad_storage, analytics_storage, etc.) into localStorage.
- Set the trigger to Consent Initialization – All Pages to ensure this loads early.
- Save and publish this tag.
Figure 2: Consent Banner Script
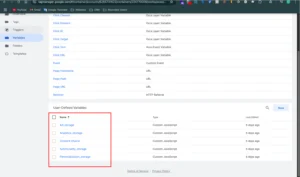
Step 2: Create GTM Variables to Capture Consent Data from Local Storage
- Create 5 Custom JavaScript variables in GTM:
ad_storage
analytics_storage
functionality_storage
personalization_storage
consent_choice
- Each variable reads the corresponding value from your localStorage object where the banner saved consent.
- This lets GTM access the user’s consent state dynamically on every page.
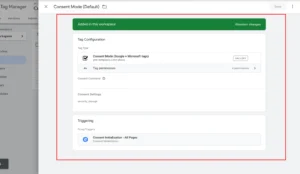
Step 3: Create a Tag to Set Default Consent (Google + Microsoft Tags)
- In GTM, create a new tag.
- Select Consent Mode (Google + Microsoft Tags) tag type.
- Configure it to set the Default Consent states using the 5 variables you created.
- Set the trigger to Consent Initialization – All Pages so it fires before any other tags.
Figure 3: Consent Variable
Step 4: Create a Tag to Set Updated Consent (Google + Microsoft Tags)
Create another Consent Mode (Google + Microsoft Tags) tag.
Configure this tag to Update Consent using the same 5 GTM variables.
Set the trigger to fire on All Pages — this tag will update consent dynamically based on stored user preferences.
Figure 4: Consent Default
Step 5: Testing Your Consent Mode Setup
Use GTM Preview Mode and Google Tag Assistant to test:
The banner appears correctly.
Consent values are saved properly in localStorage.
Both Consent Mode tags fire in the correct order with correct consent states.
Test different user actions (Allow, Deny, Save Preferences) and verify that tags behave accordingly.
Figure 5: Consent Update

Step 6: Publish Your GTM Container Version
Once tested thoroughly, publish your GTM container.
Your site now runs Consent Mode V2 without a CMP — fully controlled by your custom JavaScript and GTM setup.
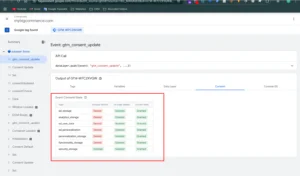
Step 7: Testing & Validation
To ensure your Google Consent Mode V2 setup works properly, follow these validation steps:
Google Tag Assistant (Preview Mode)
- Enter Preview Mode from your GTM workspace.
- Navigate your website.
- Look for key consent signals in the debug panel:
-
-
Consent Initialized -
Consent Updated
-
Consent Debug Mode
- Append
#gtm_debug=GTM-XXXXXXXto your site URL (replace with your container ID). - This activates Consent Debug Mode.
- Inspect how consent signals are passed and stored.
GA4 DebugView
- Navigate to: GA4 Admin > Configure > DebugView
- Interact with your site using different consent combinations.
- Confirm that the appropriate events fire based on user choices.
Figure 6: Consent Mode V2 Validation Testing
Step 8: Final Publish & Deployment
After successful testing:
Click Submit in your GTM workspace
Add a version name like Consent Mode V2
Click Publish to push changes live
📝 Post-Publish Tip
Monitor:
- Real-time traffic in GA4 DebugView
- Consent status & event flows in your live site
Testing
✔ Consent banner displayed correctly
✔ Consent states stored successfully
✔ Consent tags fired in correct order
✔ GA4 and Google Ads tags respected consent choices
Final Publish Step
After successful validation, publish your GTM container and monitor consent behavior inside GTM Preview and GA4 DebugView. As a result, your website will maintain privacy compliance while preserving accurate tracking signals.
Comparison: Default Tracking vs Consent Mode V2 Setup
| Feature | Without Consent Mode V2 | With Consent Mode V2 |
| Privacy Compliance | ❌ Limited | ✅ Improved |
| GA4 Tracking | ❌ Incomplete | ✅ Controlled |
| Google Ads Signals | ❌ Weak | ✅ Strong |
| Attribution Accuracy | ❌ Lower | ✅ Better |
| Consent Management | ❌ Basic | ✅ Advanced |
| Conversion Modeling | ❌ Limited | ✅ Improved |
| Scalability | ❌ Low | ✅ High |
Tracking Overview
This system uses GTM and consent signals to control how GA4 and Google Ads collect data based on user choices. Then, Consent Mode V2 dynamically updates tracking behavior according to stored consent preferences. As a result, businesses can maintain accurate attribution while staying privacy compliant.
Real Use Case
A lead generation business implemented this google consent mode v2 setup using GTM and a free custom consent banner. As a result, the company improved compliance and maintained reliable tracking performance.
- Improved GA4 tracking reliability
- Better Google Ads attribution signals
- More accurate conversion modeling
- Reduced dependency on paid CMP platforms
To implement a similar setup, follow Full Funnel Tracking for Google Ads using CRM, GTM & Stape.
Common Mistakes
- Loading consent tags after analytics tags
- Not using Consent Initialization triggers
- Incorrect localStorage variable mapping
- Skipping GTM Preview testing
- Not validating consent signals properly
As a result, these mistakes can break tracking behavior and reduce data accuracy.
Pro Tips
- Always use Consent Initialization triggers
- Validate signals using Tag Assistant
- Test multiple consent combinations
- Monitor GA4 DebugView regularly
Frequently Asked Questions
What is Google Consent Mode V2?
Google Consent Mode V2 is a privacy and consent framework developed by Google that adjusts how GA4 and Google Ads tags behave based on user consent choices. It manages consent signals such as ad_storage, analytics_storage, functionality_storage, and personalization_storage. As a result, websites can remain privacy compliant while still collecting important measurement and attribution data for analytics and advertising platforms.
Can I implement Consent Mode V2 without a paid CMP?
Yes, you can implement Google consent mode v2 setup without paid cmp by using GTM and a custom JavaScript consent banner. This setup allows you to store consent preferences in localStorage and dynamically update consent states without relying on expensive third-party CMP platforms. As a result, businesses can maintain compliance while keeping full control over their tracking implementation and user experience.
How do I test Google Consent Mode V2?
You can perform a complete google consent mode v2 test using GTM Preview Mode, Google Tag Assistant, Consent Debug Mode, and GA4 DebugView. These tools help verify whether consent signals are firing correctly and whether GA4 and Google Ads tags behave properly based on different consent choices. Therefore, testing is essential before publishing your setup live.
Why is Consent Mode V2 important?
Consent Mode V2 is important because it helps websites comply with privacy requirements while preserving valuable GA4 and Google Ads measurement signals. Without proper consent management, tracking accuracy and attribution quality may decrease significantly. However, with a correct setup, businesses can improve conversion modeling, audience signals, and campaign optimization while respecting user privacy preferences.
What trigger should I use for Consent Mode tags?
You should use the Consent Initialization – All Pages trigger for Consent Mode tags inside GTM. This trigger ensures consent states are loaded before analytics or advertising tags fire on the page. As a result, tracking behavior remains compliant and aligned with the user’s consent selections from the very beginning of the page load process.
How do I validate consent signals?
To validate consent signals, use GTM Preview Mode, Google Tag Assistant, Consent Debug Mode, and GA4 DebugView. Then, inspect whether consent states such as ad_storage and analytics_storage update correctly when users accept, deny, or customize consent preferences. As a result, you can confirm that your Consent Mode V2 setup works properly and sends accurate consent signals to Google services.
Conclusion
Implementing Google consent mode v2 setup helps businesses maintain privacy compliance while preserving accurate GA4 and Google Ads tracking. As a result, websites can improve attribution, conversion modeling, and campaign optimization without relying on expensive CMP platforms.
➡️ Learn more: How to Make Future Proof Conversion Tracking in 2026 (Full Funnel System for Lead Generation).
Ready to implement Consent Mode V2 correctly and improve compliance?
Get a complete GTM + Consent Mode setup for accurate tracking and privacy-focused data collection.
👉 WhatsApp: https://wa.me/8801735749155
👉 Book a Call: https://zcal.co/zubayerislam01/consultation
